|

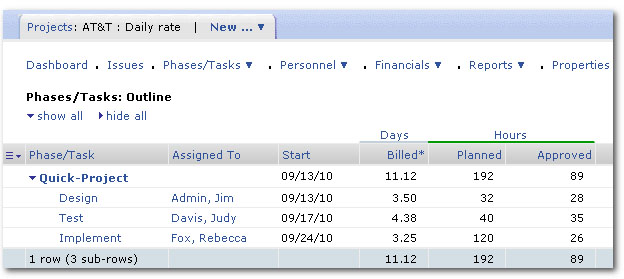
View "Day" values for daily rate charges
For companies that bill projects with daily rates, it is often helpful to see a display of the actual number of days that have been billed as well as the hours that were generated from time entries. In this release, we have added the ability for users to customize list views to display "Day" values. These list views include the project, task, create billings, project billing transactions, project outline view, and charges list views. In addition, if "Days" is displayed, the "Hours" column will be populated with the hours generated from time entries in the charges and project billing transaction list views.
To display the day value in a list view, users with the appropriate role privileges navigate to a list and click on the "Customize list view" link. Add "Days" or "Days-Billed".
There are several ways in which companies can bill by day and create daily rate charges. To enable the ability to define daily rates for billing rules, please contact OpenAir Support.
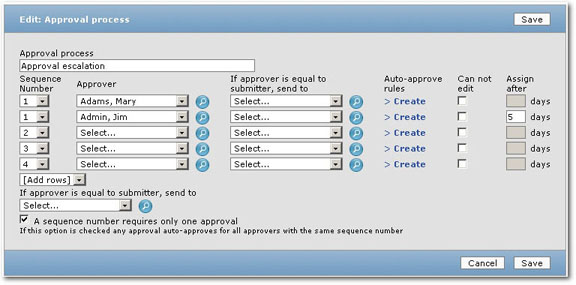
How to create a daily rate charge via billing rules by user:
- Once the daily rate functionality has been enabled, navigate to Projects > Projects [select a project] > Financials > Billing.
- Create or modify a time billing rule. In the "Bill rates" section, select "Users" under the "Get the billing rates from" dropdown.
- Select a user from the dropdown, enter their rate and select "Day" from the dropdown. Click Save.
How to create a daily rate charge via billing rules by rate card:
- Once the daily rate functionality has been enabled, navigate to Administration > Global Settings > Jobs, Rates > Rate cards > [select a rate card or create a new one].
- Select a job code, enter the rate, and select "Day" from the dropdown.
- To assign the rate card, navigate to Projects > Projects [select a project] > Financials > Billing.
- Create or modify a time billing rule. In the "Bill rates" section, select "Rate cards" under the "Get the billing rates from" dropdown.
- Select the appropriate rate card and Save.
How to create a daily rate charge manually:
- Users with the appropriate role privileges navigate to Invoices > Charges > New other rate.
- Fill in the appropriate fields as necessary and in the "Rate" field, enter the daily rate value and select "/day" value in the dropdown.
|