Enhancements
![]()
Enhancements
Create complex and customized notifications for events throughout OpenAir.
Open Project Budgets from Project QuickViews throughout OpenAir.
Find the help you need from the Help link in the User Center.
Guides are now presented in a cleaner, more readable style.
Download issue attachments without having to open each issue, and use bulk actions to download all attachments quickly and easily.
Column header filters and advanced filters have been expanded and are now available in Workspaces.
Use relative and rolling date filters to better identify when projects are on schedule.
Download Workspace attachments at the click of a button with the Download Attachments icon.
You can now set the standard field order for Project Tasks and Expense Reports/Envelopes.
The bulk action menu now takes up less space, and options are visible when the menu is clicked.
Directly download the latest XSD schema files without contacting NetSuite OpenAir Support.
Add, update, and display project status messages to keep project stakeholders informed.
All task fields are now available for use in the Project Status Summary Task Assignment card.
Easily create copies of billing and revenue recognition rules.
Break the task worksheet into separate pages to increase performance and make large amounts of information more manageable.
Find everything you need to know about any resource all in one place.
Get control over your resources' skills and delegate the responsibility of keeping their profiles up-to-date.
Add descriptions to skill levels to help your resource managers assign the right level to each resource.
Save your Resource Compare View results in a variety of file formats.
Set which three fields appear under each resource's name in the Resource Compare View header.
Get more information from your Resource Profile Reports.
Eliminate human error by ensuring that time off requests are submitted at the same time they are saved.
Use a new role permission to change booking types on finalized Resource Requests.
New filters have been added for project owner, active/inactive user status, resource's manager, and booking type.
Load up to 2,000 bookings at a time.
Customize which Booking Worksheet columns appear and in what order they appear.
Scroll horizontally or vertically – what you need stays in view.
Use this feature to require users to input a job code when creating bookings in the Dynamic or Advanced Booking Worksheets.
Display the charge cost center field in your lists of charges and the "new invoice" list view.
Add contact information fields available in a project to your reports and project list views.
You can now use user-defined currencies in both customer purchase orders and agreement detail reports and as a detail option in summary reports.
Keep personal user data safe with a new feature which hides this data in the timesheet report.
Retrieve NetSuite vendor credit details for OpenAir as negative purchase items linked to OpenAir projects.
Integrate purchase requests on approval in real-time.
Take advantage of NetSuite 2016.2 features.
Change forms quickly and easily with scripts using the new NSOA.form.setValue command.
See how many log entries are part of a log without having to open each log.
Detailed trace log messages for script timeouts.
Use prepopulated timesheets to speed up your workflow.
As of the April 15, 2017 release, NetSuite OpenAir will no longer support any connections using Windows 2003.
In addition, NetSuite OpenAir will no longer support LDAP connections as of the April 15, 2017 release. LDAPS will continue to be supported.
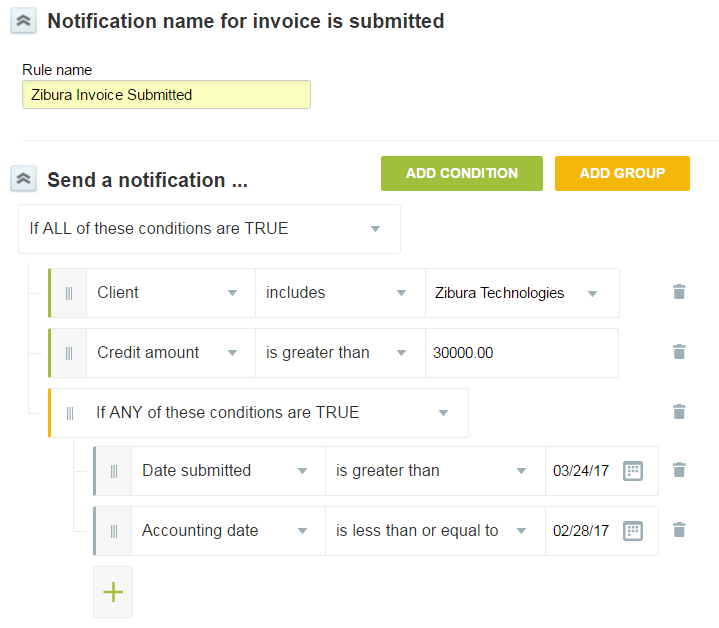
upUse this feature to create complex and customized notifications for events throughout OpenAir!
Query Builder notification conditions are organized into groups which each contain a condition statement such as "if all of the following conditions are true" or "if none of the following conditions are true". A notification is sent when the conditions you've created are met.
Note: To enable this feature, please contact NetSuite OpenAir Support and request the Query Builder feature.
Warning: Conditions with groups can only be created with this feature enabled. If you later disable this feature, notifications created when this feature was enabled will be deactivated if they contain groups.
To create a notification using Query Builder:
Go to Administration > Application Settings > [Select the module settings which requires a notification] > Notifications.
Click the Create button and click the type of notification you want to create under "New". The new notification form appears.
Enter a "Rule name" for the notification. This name will appear in the Notifications list view.
In the "Send a notification …" section, click the dropdown list and select the appropriate condition statement. The following condition statements are available:
If ALL of these conditions are TRUE
If ALL of these conditions are FALSE
If ANY of these conditions are TRUE
If ANY of these conditions are FALSE
Click the ADD CONDITION button to add new conditions to condition statement. Click the ADD GROUP button to add a new condition statement to which conditions can be added.
Note: You can also add conditions to a group using the + icon under the group's condition statement.
In the "Notify" section, select who the notifications should be sent to when triggered.
In the "Email message" section, enter the subject of the email which will be sent when the notification is triggered, and any text you would like to have in the Email body. Use the "Field" dropdown list to add variables to the email body.
In the "Other" section, select "Active notification" to allow the notification to trigger in OpenAir.
Click Save.
To delete a group or condition in Query Builder:
Click the delete  icon next to the condition or group you want to delete.
To move a group or condition to a new location within the query in Query Builder:
Click the  icon on the left of the group or condition and drag it to a new location within the query.
Note: When you drag a group which has conditions associated with it, both the group and its conditions are moved together.
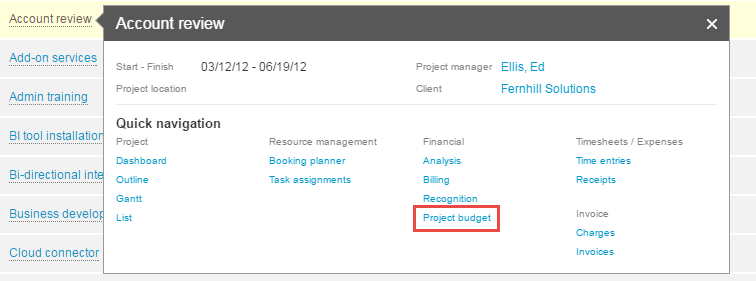
Open Project Budgets from Project QuickViews throughout OpenAir.
A "Project budget" link now appears under "Financial" in Project QuickViews when you point to a project name anywhere in OpenAir. The link opens a Project budget list view if budgets exist for the project, or the new project budget form if there are no existing budgets.
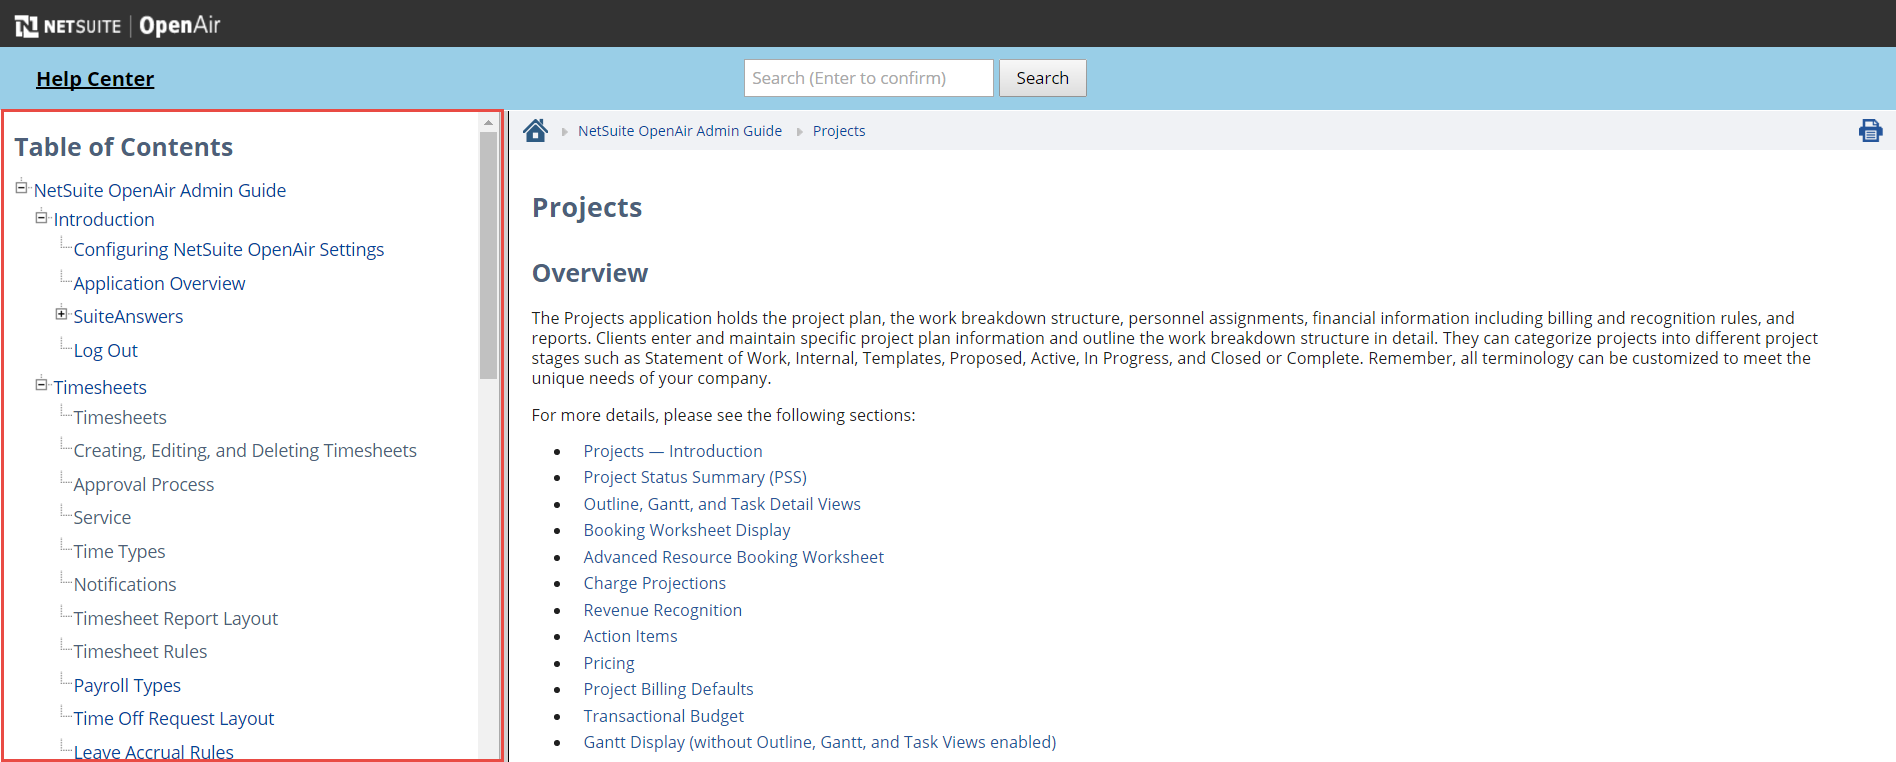
Find the help you need from the Help link in the User Center.
The OpenAir Help Center is synchronized with OpenAir PDF guides and SuiteAnswers updates, and is presented in an easy-to-use interface.
The Help Center features a collapsible navigation pane to easily move between topics and breadcrumbs to show where you are within a topic. To collapse or expand a topic, click the + or – icons next to the topic.
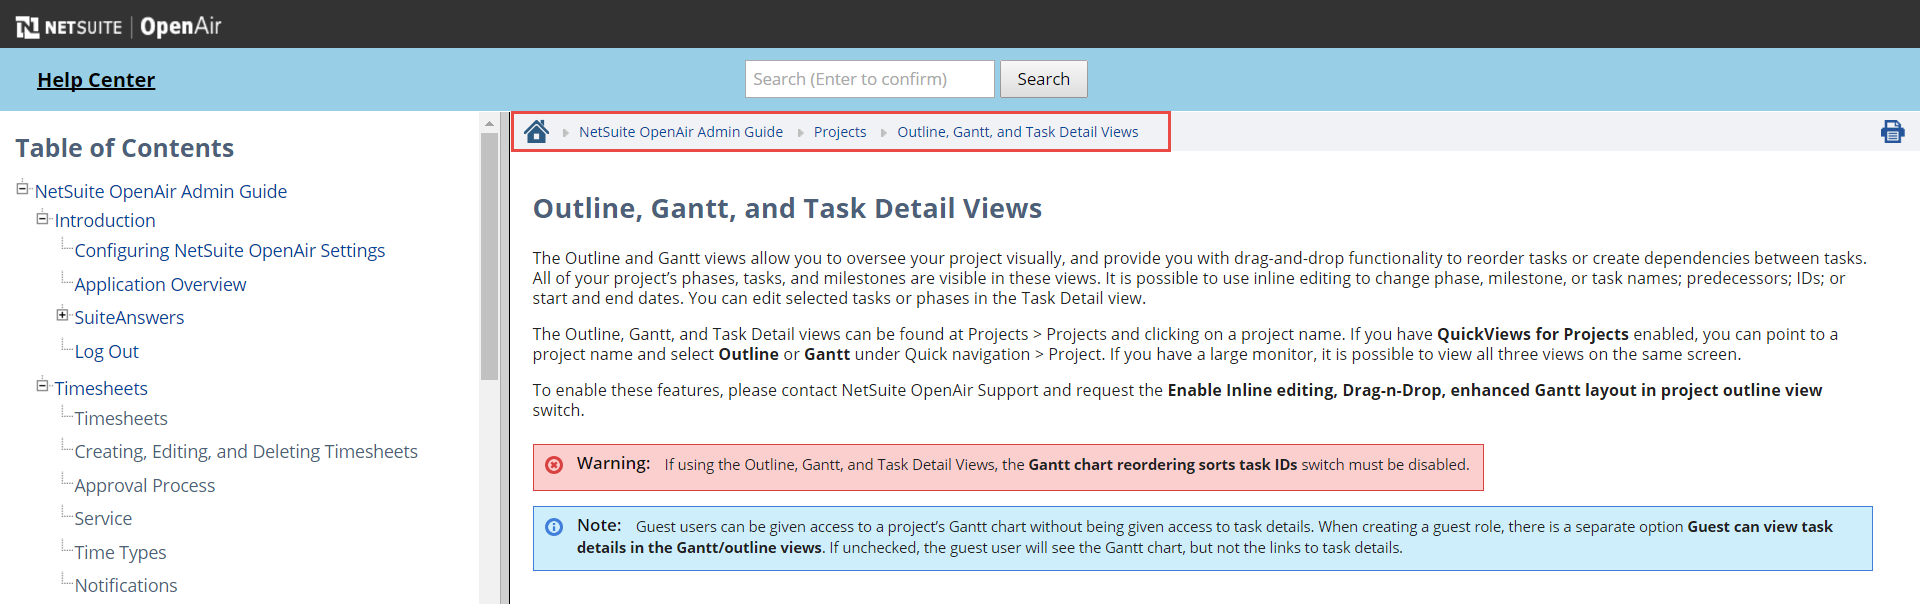
You can also use breadcrumbs located at the top of a help article to navigate the Help Center. The breadcrumbs show where you are in a guide and topic. Click a topic in the breadcrumb and you will go to that article.
Search for specific topics and receive results ranked by how closely they match your search terms.
To search for exact search terms, use double quotes around the search term you want to find. For example, "project stage" will search for the term "project stage", but not "project" or "stage" individually.
Help topics can be printed for ease of reference. To print a Help Center article, click the Printer icon in the upper right corner of the article.
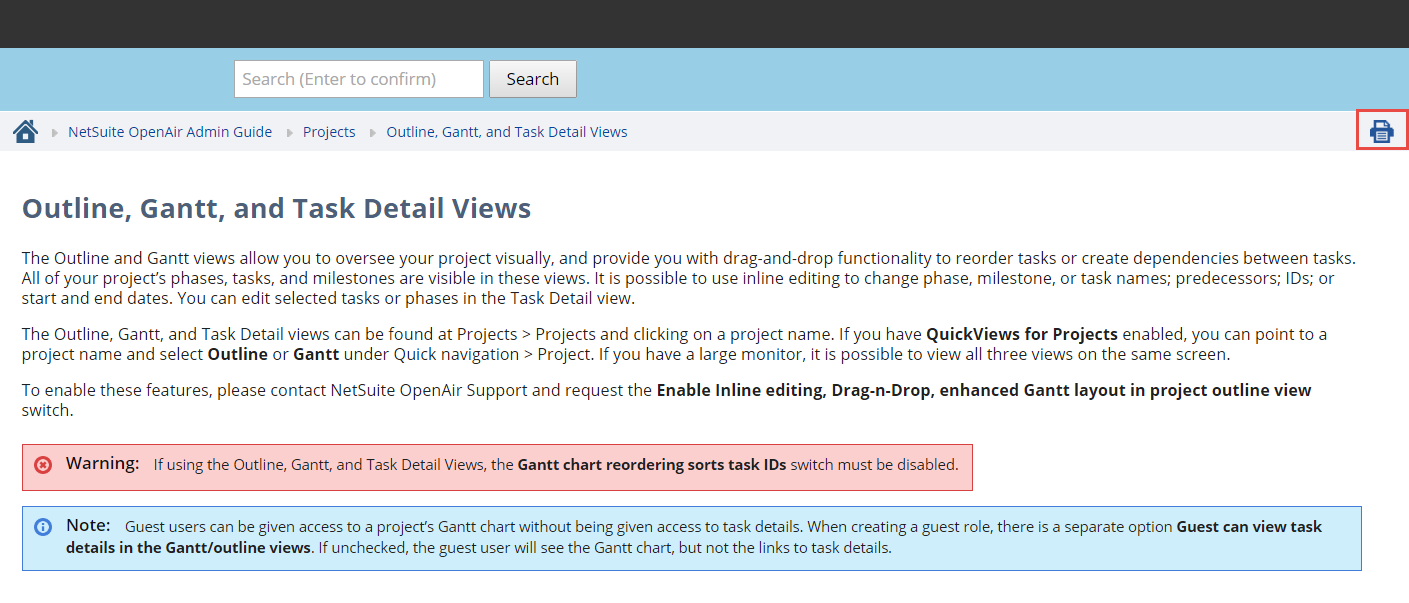
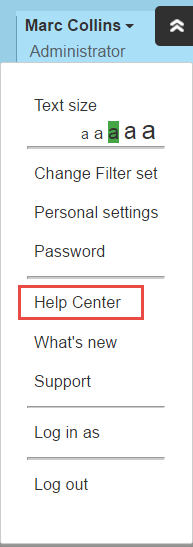
To access the Help Center, click the User Center and select "Help Center". The Help Center will open in a new tab or window, depending on your browser settings.
Note: To enable this feature, please contact NetSuite OpenAir Support and request the "OpenAir Help Center" feature.
When the Help Center is enabled, you must select which roles have access to it. To allow a role to access the Help Center, go to Administration > Global Settings > Users > Roles > [Select a role] > General Settings and select the "View Help Center" role permission.
Guides are now presented in a cleaner, more readable style.
OpenAir's PDF guides have received a complete makeover. You can still find all of the information you need within, but that information is now presented in a style which more closely matches the Help Center and SuiteAnswers display style.

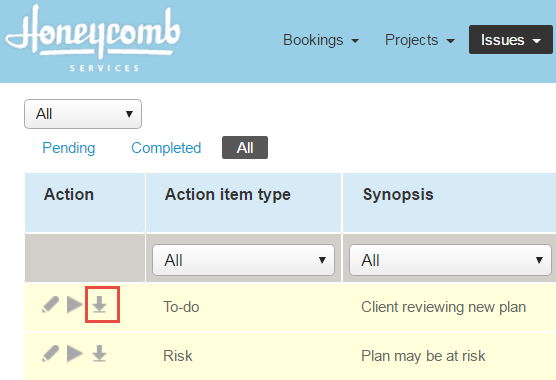
Download issue attachments without having to open each issue to download files individually, and use bulk actions to download all attachments for multiple selected issues quickly and easily.
A new "Download" icon has been added to the "Action" column in project issues list views. Click this icon to download all attachments for one issue.
Note: If an individual issue contains multiple attachments, OpenAir will download all the attachments for that issue into one ZIP file.
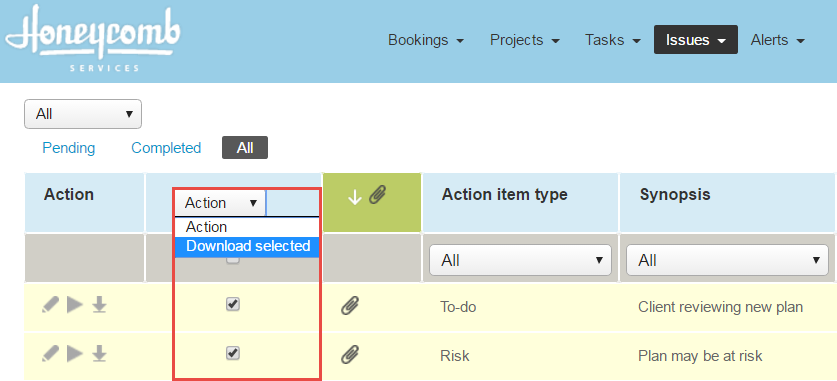
You can also download attachments from more than one project issue.
To download attachments from more than one project issue at one time:
Go to Projects > Issues > [select an issue list view].
Add the "Run an action" column to the list view.
In the "Run an action" column, select the issues which you want to download attachments from.
In the "Action" dropdown list, select "Download selected".
Note: OpenAir will download all the attachments for the selected issues into one ZIP file.
Column header filters and advanced filters have been expanded and are now available in the following workspace areas:
Workspaces > Documents > All
Workspaces > Documents > Search
Workspaces > Workspaces > Search
Workspaces > [Select a workspace] > Search
Workspaces > [Select a workspace] > Documents
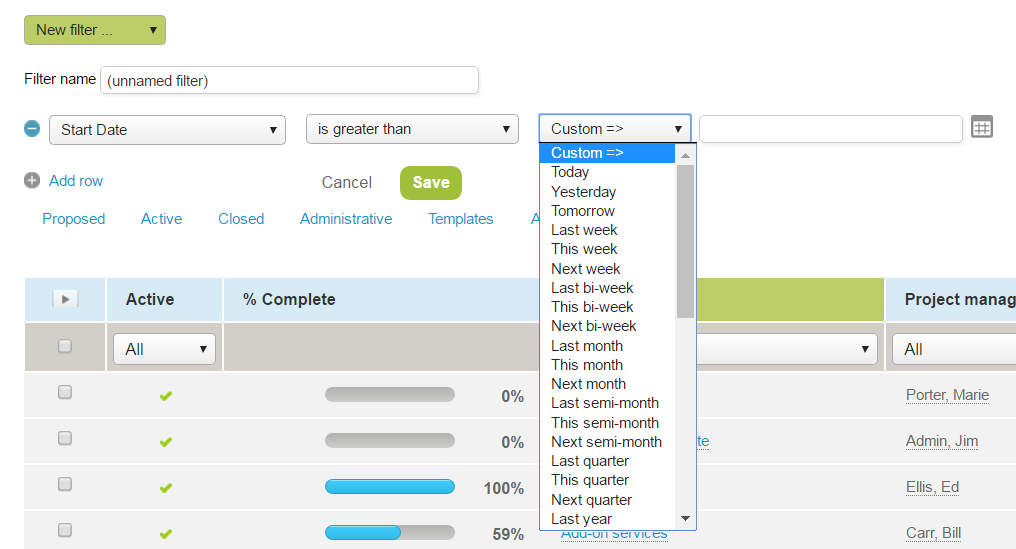
Use relative and rolling date filters to better identify when projects are on schedule.
These filters are available in all date fields in Advanced Filters.
You can also use these filters in Project Status Summaries.
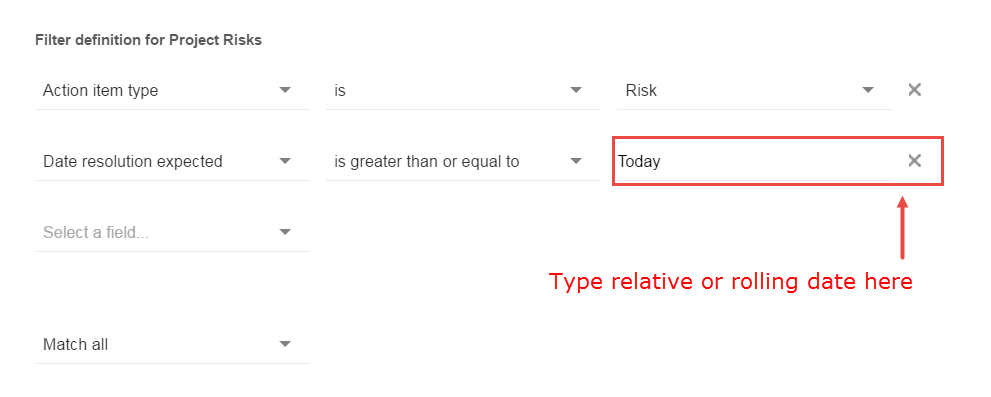
Note: To use rolling and relative date filters in Project Status Summaries, you must manually enter the date operands as shown below in the custom date text field.
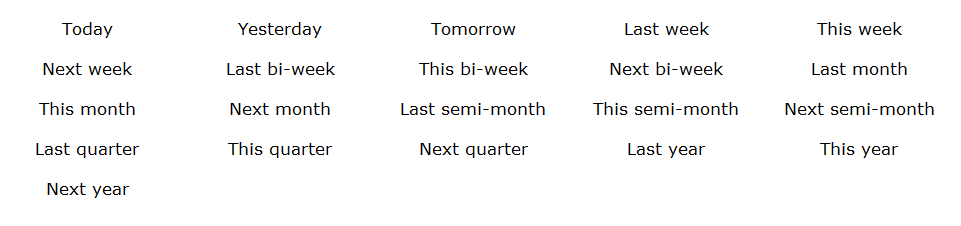
The available relative or rolling date operands are:
For example, in the Project Status Summary filter definition, select "Date resolution expected" in the first drop-down list, select "is greater than or equal to" in the second drop-down list, and type "Today" in the text field.
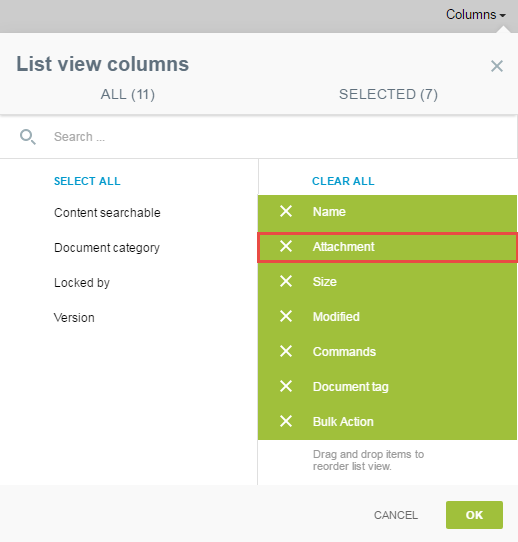
Download Workspace attachments at the click of a button with the Download Attachments icon.
To add the Download Workspace Attachments icon:
Go to Workspaces > Workspaces > [Select a Workspace] > Documents.
Click the Columns dropdown menu.
Click "Attachment" in the "All" column.
Drag "Attachment" to the order you would like in the "Selected" column.
Click OK.
To download attachments from a workspace:
Go to Workspaces > Workspaces > [select a Workspace] > Documents.
Click the Download Attachments icon. Depending on your browser settings, your file will be downloaded or you will be asked to choose a location to download the file to.
This feature is available in the following locations:
Workspaces > Documents > All
Workspaces > Documents > Search
Workspaces > Workspaces > Search
Workspaces > [Select a workspace] > Search
Workspaces > [Select a workspace] > Documents
You can now set the standard field order for Project Tasks and Expense Reports (Envelopes).
Note: The following fields are moved together as a group:
Project Tasks:
"ID" and "Task name"
"Priority", "Part of Phase", and "Project task type"
"Planned hours" and "Percent complete"
"Start date" and "End date"
"Employee", "Hours remaining", and "Override (hours)"
Expense Reports/Envelopes:
"Tracking number" and "Currency"
"Date" and "Accounting date"
To change the field order in Project Tasks or Expense Reports/Envelopes:
Go to Administration > Customization > [select "Expenses" or "Projects"] > [select "Expense Reports" or "Project task"].
Click the "Field order" tab.
Click the Create link.
Enter a Field order name in the "Name" field.
In the "Field order" list, arrange the available fields in the order you want them to appear on the form.
Select the roles which this field order is assigned to.
Click Save.
Directly download the latest XSD schema files without contacting NetSuite OpenAir Support.
To export an XSD schema file:
Go to Administration > Global Settings > Account > Integration: Import/Export.
Under "Account data", click the "XSD schema files" link. The system will generate a ZIP file with all of the XSD schema data.
Click the "Click here" link to download the XSD schema ZIP file.
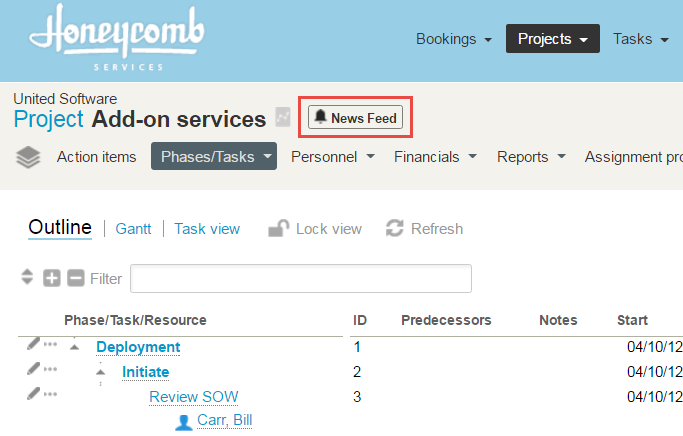
Add, update, and display project status messages to keep project stakeholders informed.
When this feature is enabled, a "News Feed" icon is added to the header of your projects or Project Quick Views. Click this icon to open the Project Status News Feed, where you can add status updates to your project or read existing updates.
To enable this feature, please contact NetSuite OpenAir Support and request the "Project Status News Feed" feature. You will also need to assign users one of the following roles:
To add a project status update to a project:
Go to Projects > Projects> [Select a project].
Click the "News Feed" icon. The "Project Status New Feed" appears.
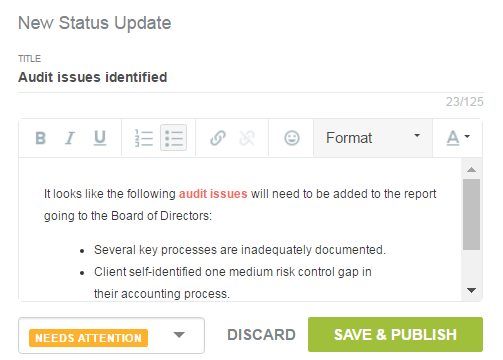
Click the  icon in the top right corner of the Project Status News Feed. The "New Status Update" dialog appears.
Click the "Title" field and enter a title for the Status Update. Titles are limited to 125 text characters. Status Updates do not require a title.
In the main text box below the title, enter the project status message. The main text box uses a rich text editor with the following features:
Creating bold, italicized, or underlined text
Creating bullet lists or numbered lists
Adding hyperlinks
Adding emoticons
Distinguishing between headers and main body text
Changing font color
Status update body text cannot exceed 3,000 characters.
In the Status Tag dropdown list, select a pre-defined status tag for the message.
When you have finished editing the text for your Status Update, click SAVE & PUBLISH. You can also click DISCARD to return to the Project Status News Feed without saving the message.
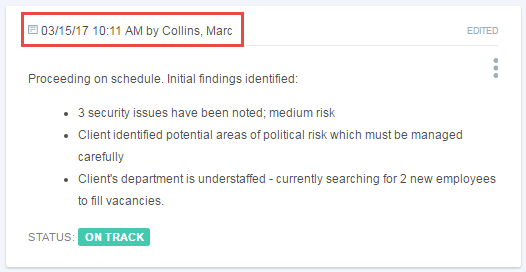
Each Status Update is tagged with a time and date stamp and the name of the person who wrote it.
Status updates can be edited after they've been published.
To edit a Status Update:
Point to the upper right corner of the Status Update you want to edit and click on the Options  icon which appears.
Click "Edit". The "New Status Update" editor opens with the title and text of the status update you want to edit.
Make the necessary changes to the status update, and click SAVE & PUBLISH.
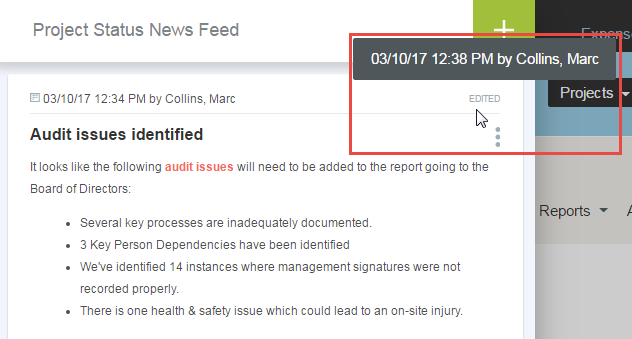
When a Status Update is edited and published, it appears in the Project Status New Feed with an "EDITED" tag in the upper right corner. Point to this tag to see who edited the update and when it was edited.
To delete a Status Update:
Point to the upper right corner of the status update message you want to edit and click on the Options  icon which appears.
Click Delete. OpenAir will ask if you are sure you want to remove the message.
Click OK.
By default, the Project Status News Feed displays 5 update messages when opened. Click the "Load More" button at the bottom of the update list to load additional messages.
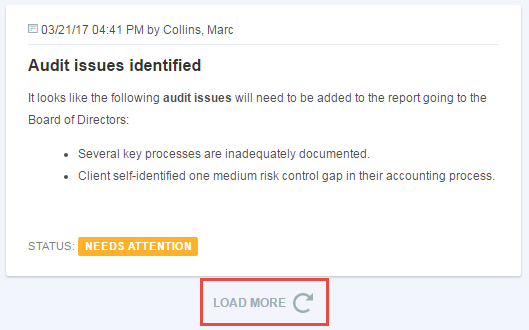
A scrollbar will appear in the News Feed when there are many Status Updates to display so that users can scroll through the full list.
For status updates with large amounts of text, click "Read More" in the bottom right of the update to see all the text.

To close the Project Status News Feed, click anywhere outside of it.
All task fields are now available for use in the Project Status Summary Task Assignment card. You can also sort and filter by available task fields.
Note: Filtering by Task start and Task finish dates is not supported.
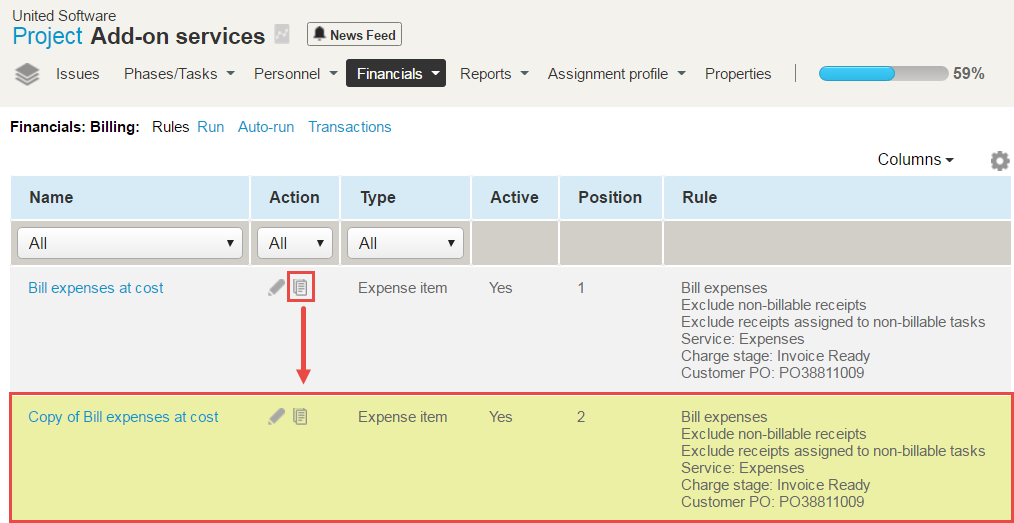
Create copies of billing and revenue recognition rules within a given project. This feature creates a copy of a selected rule with a "Copy of" prefix and opens the form directly for quick and easy updates.
Note: Custom fields marked as "Never Clone" or "Never Repeat" are not copied in the new rule. Sequential custom fields are increased by one value in the sequence.
Break the task worksheet into separate pages to increase performance and make large amounts of information more manageable.
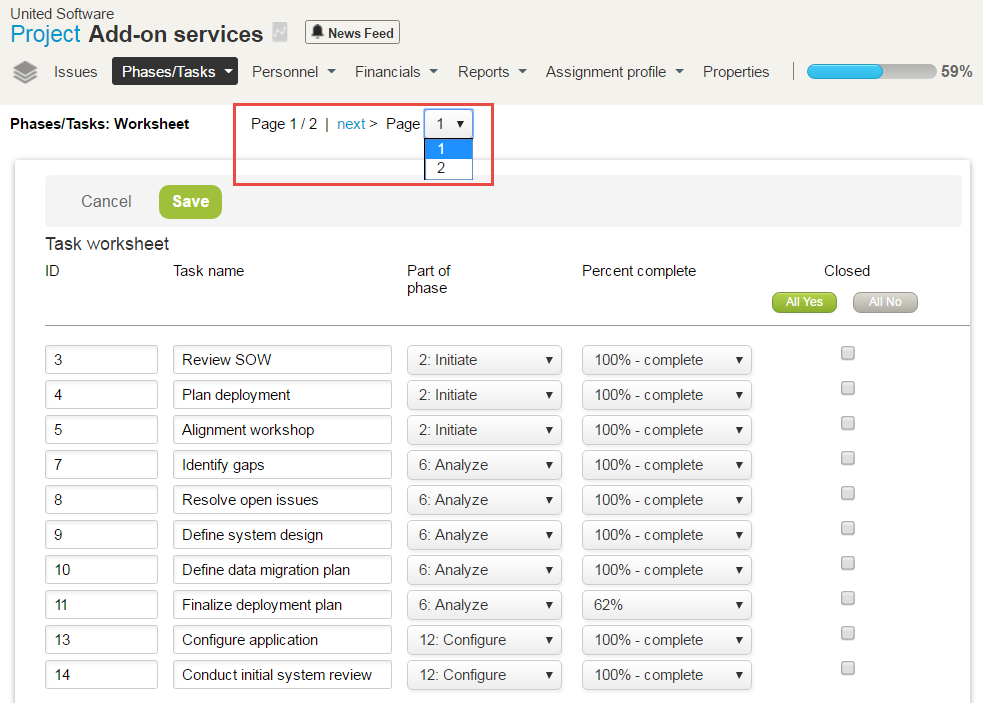
Go to Administration > Application Settings > Projects Settings > Worksheet Display.
In the "Number of paginated rows to display" field, enter the number of tasks you want to show on each page. Clear the field to disable this feature.
Select "Enable sorting on columns ID and Task name" to allow users to sort these columns alphanumerically in ascending or descending order.
Click Save.
Display the charge cost center field in your lists of charges and the "New invoice" list view. You can also use "charge cost center" as an advanced filter in the "New invoice" form.
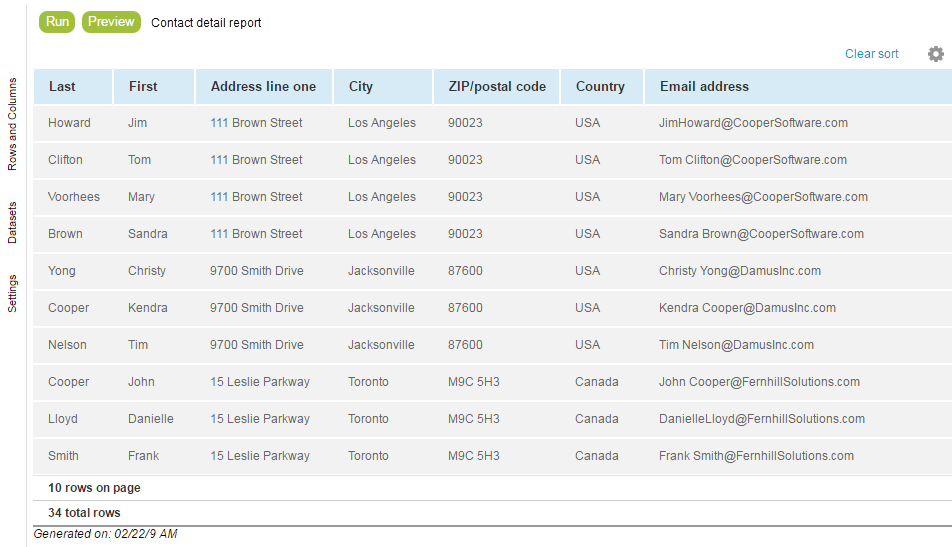
upAdd any contact information fields available in a project to your reports and project list views.
When creating reports, you can now select any contact information fields which you use in projects and display them in reports and project list views. The following contact fields are supported:
| Active | Address line one | Address line two | Audit trail | Can be a billing contact |
| Can be a shipping contact | Can be a sold to contact | City | Client | Client – business type |
| Country | Created | Email address | Fax number | First |
| Internal id | Internal id – customer_id | Job title | Last | Mobile number |
| Name | Notes | Phone number | Project status | State/Province |
| Title | Type | Updated | Zip/Postal code |
These fields can be used in both Tabular and Crosstabbed reports when creating reports using the report form or the Report Management and Report Editor tools. These fields are also available in any project list views.
Note: If you have enabled any of the following settings on your account, contact information fields will be available to view in list views and reports:
Enable shipping contacts
Enable sold to contacts
Allow create and modify of client's contacts directly from project properties form
Please contact NetSuite OpenAir Support to enable or disable these settings.
You can now use user-defined currencies in both customer purchase orders and agreement detail reports. You can also add them as a detail field option in summary reports.
Keep personal user data safe with a new feature which hides this data in the timesheet report.
This feature hides personal data from timesheet reports, but not from other reports where you may need that information.
To hide personal user data in Timesheet reports, go to Administration > Application settings > Timesheets settings > Timesheet report layout and select "Hide personal user information on timesheet reports".
Note: The "Hide personal user information on timesheet reports" option will not appear in the Timesheet report layout form if your company has the "Hide personal employee information on reports" internal setting enabled. Please contact NetSuite OpenAir Support to enable or disable this internal setting.
The "Hours Remaining" field in Timesheet Reports can also be hidden.
To hide the "Hours Remaining" field in Timesheet Reports:
Go to Administration > Application Settings > Timesheets Settings > Timesheet report layout.
In the "Other" section of the Timesheet report layout form, select the "Hide "Hours remaining on tasks" section on timesheet reports" setting.
Create cleaner reports and hide internal information by hiding the "Hours Remaining" for tasks in timesheet reports.
upGet clear and complete details on each of your resources!
Use consolidated resource profiles to see what skills and experience your resources have at a glance. It is also easy to update your resources' skills - essential for assigning the right resource to the right task and keeping them engaged, motivated, and increasing revenue.
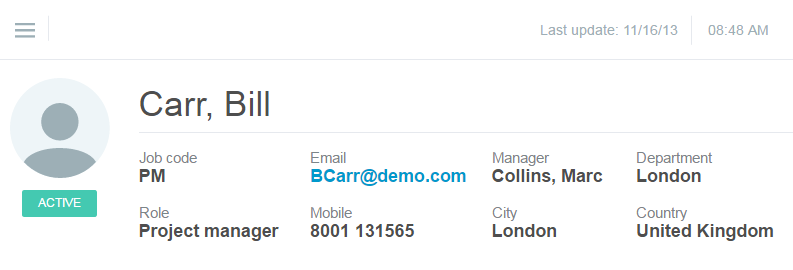
The consolidated resource profile contains a header with customizable information such as the resource's email address, manager, location, or any user custom field arranged in four columns. There is no limit to the number of fields which can be shown in the header.
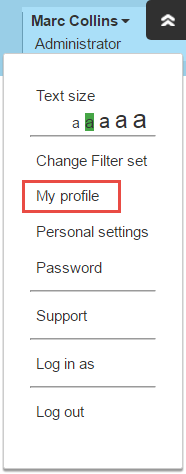
Note: To enable this feature, please contact NetSuite OpenAir Support and request the Consolidated Resource Profiles feature. Resources with the "View my own profile" role permission can see their information but cannot edit their demographics or custom fields. Resources with the "View and modify my own profile" role permission can also update their skills and experiences, but not the demographics. Users with either role will see a "My profile" link in the User Center which opens the Consolidated Resource Profile.
Warning: Users will not be able to see information hidden by a switch or role permission, (for example, "Cost" or "Rate"). These fields will instead display an empty field. Custom fields and their data are always visible. Do not add custom fields to the Resource Profile which should remain hidden from some users.
To edit which fields appear in the header:
Click the menu icon and click Edit layout.
Click the Add new item icon. The Add new item menu opens.
Click on fields in the "All" list which you want to appear in the header. You can also click "Select All" to add all available fields to the header.
Click the X icon next to selected fields to remove them from the header individually. You can also click "Clear All" to remove all fields from the header.
Drag fields in the "Selected" list to arrange them in the order you would like.
Click OK.
Click Save to save the changes without leaving the Consolidated Resource Profile's edit mode. This is useful if you want to make changes to other parts of the Consolidated Resource Profile.
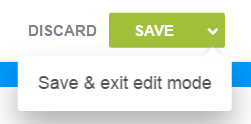
Click the icon next to Save and click Save & exit edit mode to save your changes and exit the Consolidated Resource Profile's edit mode.
Click Discard to exit edit mode without saving any changes.
Note: Users with the "Edit Consolidated Resource Profile layout and settings" role can change the layout of the consolidated resource profile for your company's account. Simply select any resource's profile, edit and save the layout, and it is modified across the whole account.
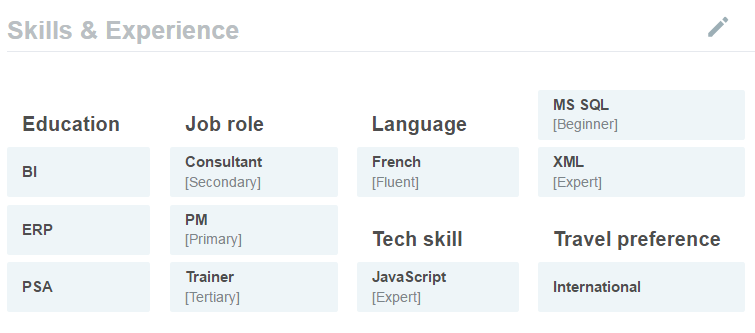
Below the header is a table of the resource's skills and experience. Click each skill to see descriptions of each skill level (see Customizable Skill Level Descriptions).
To add skills in the Consolidated Resource Profile:
Click the "Edit Skills"  icon.
icon.
Click the "Add Skills"  icon. A form appears where you can select which skill to add.
Click the Skill and Skill Level you would like to add from the list on the left side of the form. The skill will be added to the Consolidated Resource Profile when you click it. You can also search for a skill's name using the "Search for new skills…" field at the top of the form.
Note: You can use the keyboard arrow keys and search form to quickly navigate through the new skills form without needing to use a mouse.
Click anywhere outside of the form to close it and return to the Consolidated Resource Profile. The skill or skills which you added will be highlighted in blue.
Click Save or Save & Submit to save the new skills.
To edit or delete skills in the Consolidated Resource Profile:
Click the "Edit Skills"  icon.
icon.
Click the  icon next to the skill you want to edit.
Click Edit note to add a custom note to the skill.
Click Delete to remove the skill from the Skills & Experience table. If you delete a skill by mistake, click the  icon and click Revert / Undo.
Newly added skills are highlighted in blue, while deleted skills are highlighted in red. No changes are saved until you click Save.
Note: If Skills Approvals are enabled, to change a skill's level (for example, to change Intermediate French to Advanced French), first delete the old level of the skill. The resource profile approver should then approve the deletion. Next, add the new skill level, and submit for approval.
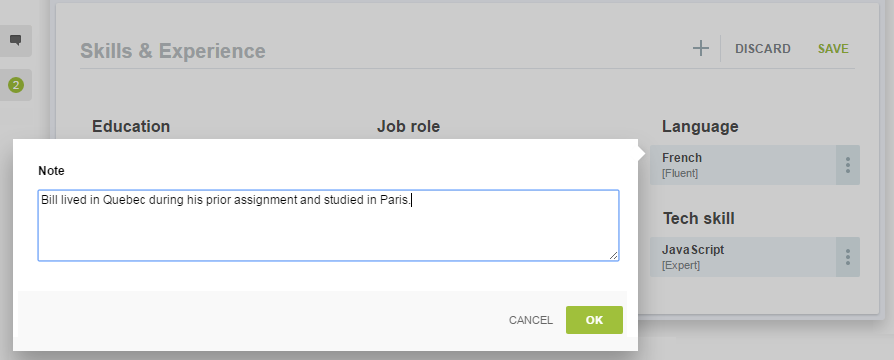
To add resource profile comments to a resource's skills:
Go to Resources > Resources > [choose a resource] > Profile.
Click the Edit skills icon.
Click the icon next to the skill you would like to add a comment to and select Edit note.
Add the profile comment in the Note field and click OK.
Click Save in the upper right corner of the Skills & Experience table.
Get control over your resources' skills! With this feature, you can delegate the responsibility of keeping your resources' profiles up-to-date. The system notifies you when your resources update their skills in the Resource Profile. With your approval, the skills are updated.
Note: To enable this feature, please contact NetSuite OpenAir Support and request the Skills Approval feature.
Resources with either of the following role permissions can edit their own skills and experience in their profile:
View and modify own resource profile
View and modify profiles
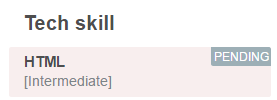
When one of your resources makes a change to their resource profile and clicks Save & Submit, the change is marked with a "Pending" tag in their profile.
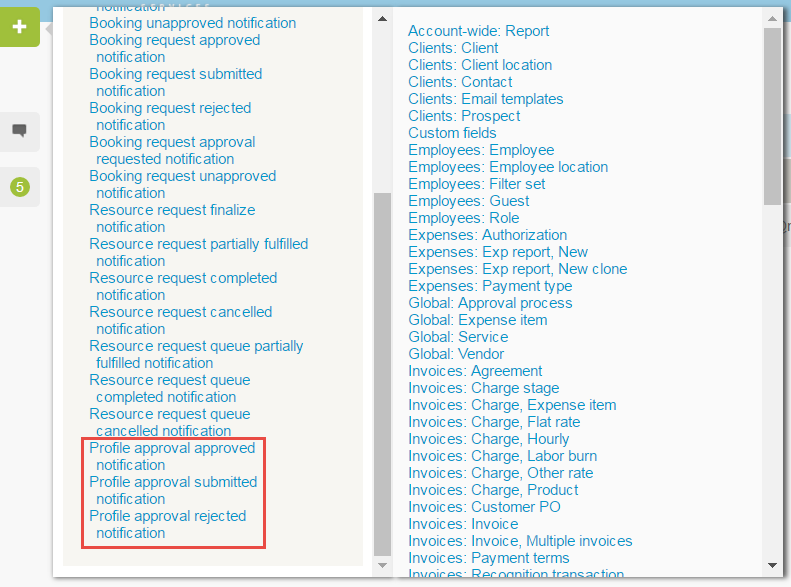
You will also receive a notification that your resource has made a change to their resource profile. You can set these notifications in Administration > Application Settings > Resources Settings > Notifications. Once set, approval notifications will appear on the Dashboard in the Home module as with other types of approvals.
To approve or reject a resource's changes to their resource profile:
Go to Resources > Profile approval > [Select "All" or "Submitted"].
Click a change to approve. The "View profile approval lines" page appears.
Select the changes you want to approve in the "Run an Action" column.
To approve selected changes, click the "Run an Action" dropdown list and select the "Approve selected and reject all others" option. To reject selected changes, click the "Run an Action" dropdown list and select the "Reject selected" option.
NOTE: Be sure to select all changes which you want to approve before clicking the "Approve selected and reject all others" option.
Add descriptions to skill levels to help your resource managers assign the right level to each resource. These descriptions appear in skill description pop-up windows when you point to a skill in Consolidated Resource Profiles.
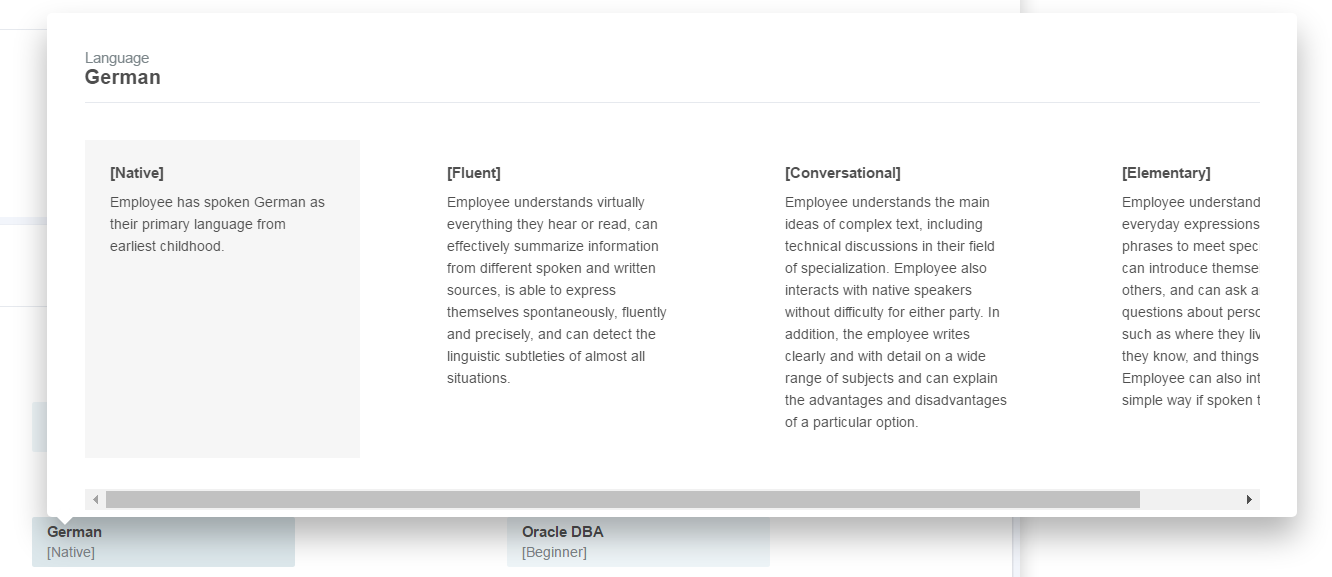
To add descriptions for a skill level:
Point to a skill in the Consolidated Resource Profile to open a descriptive pop-up window for that skill, including descriptions of all levels of competency.
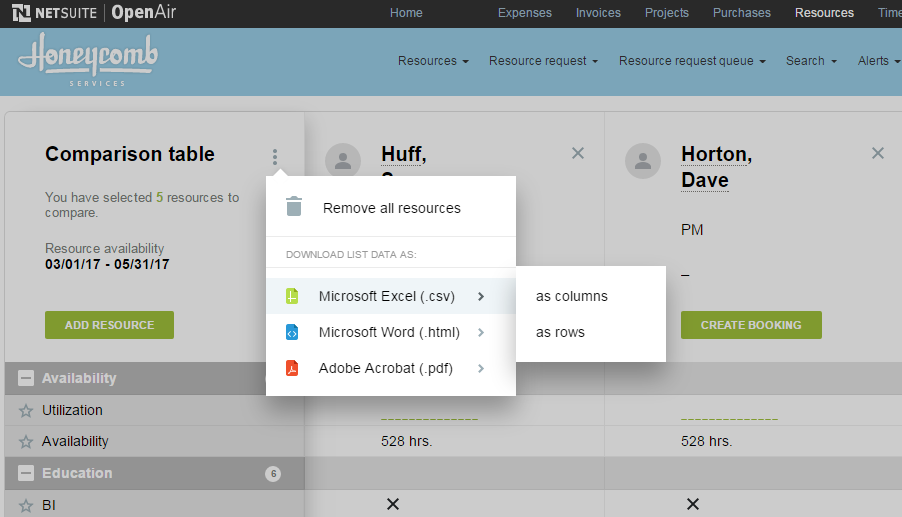
Save your Resource Compare View results in a variety of file formats.
Using this feature, you can download the Resource Comparison table as CSV, HTML, or PDF files. You can also customize the downloaded file to display one resource per row, or one resource per column.
Set which three fields appear under each resource's name in the Resource Compare View header. Any user demographic or custom fields can be selected to appear in the heading.
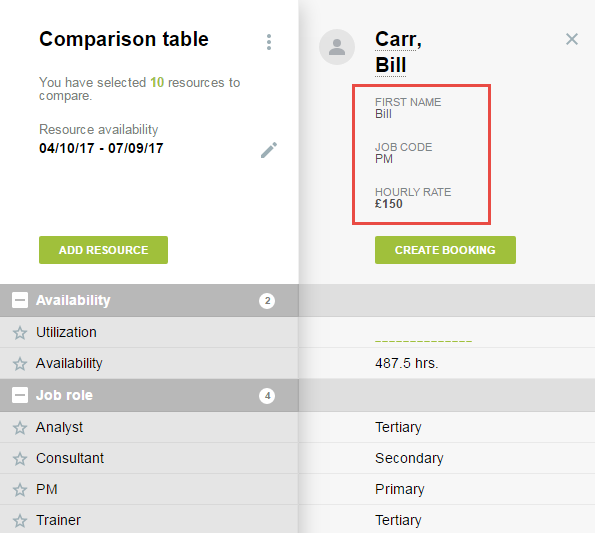
To select which fields appear in the Resource Compare View headers, go to Administration > Application Settings > Resources Settings > Resource compare view options and select the fields to display in the "Header settings" section of the Resource Compare View Options form.
Note: If you try to set more than 3 fields in the header, you will receive an error message.
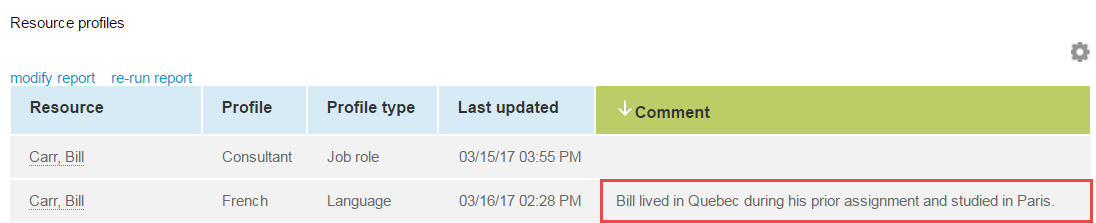
Get more information in your Resource Profile reports.
With this feature, you can add detailed notes to each individual skill in a resource's profile. The information in these notes can be displayed in Advanced Resource Profile Reports.
To show Resource Profile comments in Resource Profile advanced reports:
Go to Reports > Advanced > Resources > Resource profiles.
In the "Filters and layout options" section of the Resource profiles form, click > Edit next to "Report layout".
Select the "Comment" field in the "Available" list and click Add selected >.
Click OK.
Click Run the report to create the populated report now or Save to save the report settings and run it later.
When the report is run, the "Comments" column will be added to the report and populated with comments entered in the consolidated resource profile.
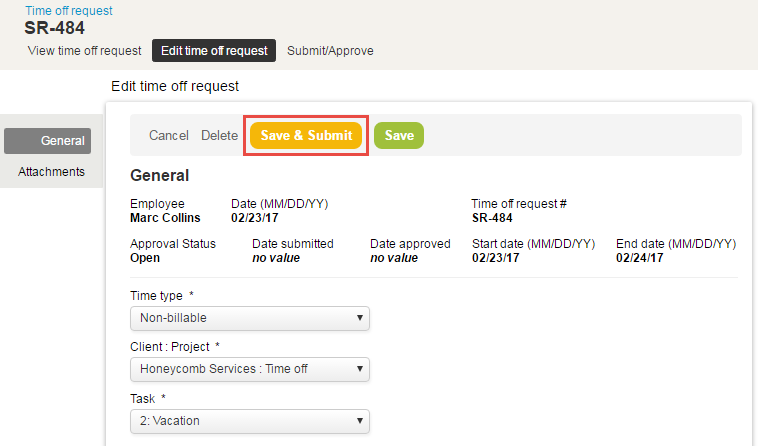
Eliminate human error by ensuring that time off requests are submitted at the same time they are saved.
When this feature is enabled, a "Save & Submit" button is added to time off request forms. This button allows users to submit a time off request as soon as they save it. The form retains the "Save" button, which saves a time off request without submitting it.
To enable this feature, go to Administration > Application Settings > Timesheets Settings > Other Settings and select the "Enable the "Save and Submit" button on timesheets and time off requests" setting.
Use a new role permission to change booking types on finalized Resource Demand Requests.
Users with the "Allow change of booking type on finalized Resource request" role permission can edit the booking type field in Resource Demand Requests even after they've been submitted to a resource manager.
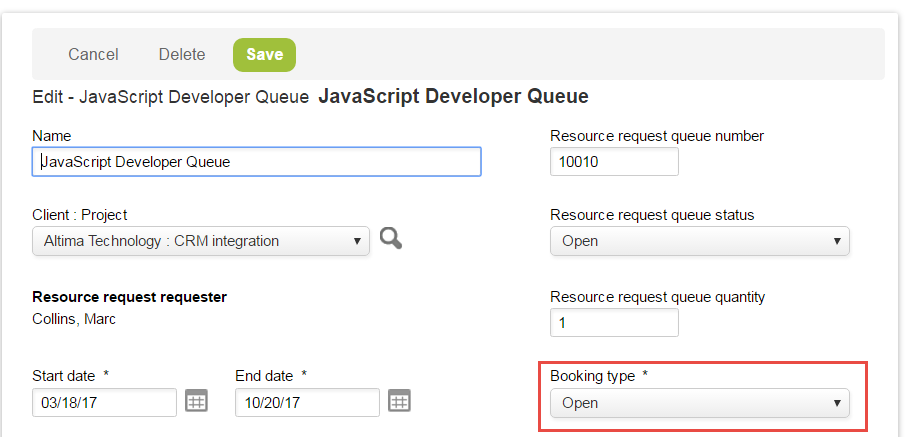
Note: This feature requires the “Enable a booking type to exist in all approval statuses” account setting. In addition, any bookings created after submittal will retain the Booking Type which was set at the time the bookings were created, even if the Booking Type is later changed in the Resource Demand Request.
New filters have been added for project owner, active/inactive user status, resource's manager, or booking type.
Load up to 2,000 bookings at a time!
By default, the Advanced Booking Worksheet loads up to 500 bookings when opened. With this feature, the number of bookings which are loaded can be changed to 1,000 bookings, 1,500 bookings, or 2,000 bookings.
Note: Increasing the number of bookings which are displayed in the Advanced Booking Worksheet may impact performance.
To load more bookings in the Advanced Booking Worksheet when opened, please contact NetSuite OpenAir Support and ask them to set the desired number of bookings to display in the Advanced Booking Worksheet.
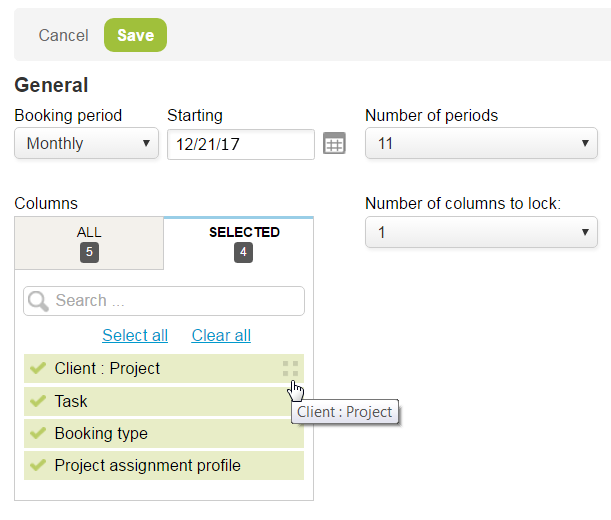
Get the information you need by customizing which Booking Worksheet columns appear and in what order they appear.
To customize Booking Worksheet columns:
Go to Projects > Bookings > Worksheet and click the Settings icon.
In the "Columns" section of the Booking worksheet settings form, click the names of the columns you want to appear in the Booking Worksheet from the "All" tab.
In the "Selected" tab, click the names of columns which you don't want to appear in the Booking Worksheet.
Search for specific column names using the Search field.
Reorder columns by clicking and dragging the "Drag to reorder item"  icon at the right side of the column name.
Click Save.
Scroll horizontally and vertically – what you need stays in view!
To lock Advanced Booking Worksheet columns so that they stay in view during horizontal scrolling:
Go to Projects > Bookings > Worksheet.
Click the Column Lock icon at the top of the column which you want to keep in view when scrolling.
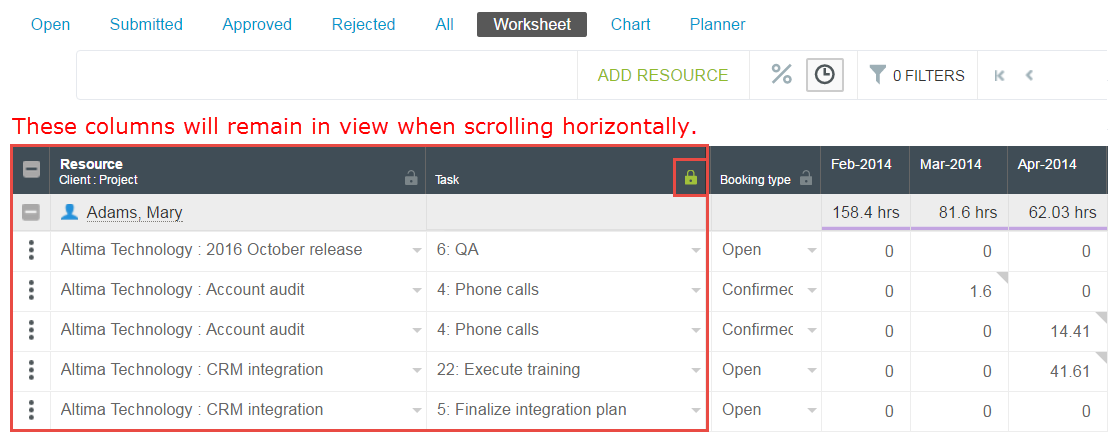
Note: All columns on the left side of the locked column will remain in view when scrolling horizontally.
Use this feature to require users to input a job code when creating bookings in the Dynamic or Advanced Booking Worksheets. When this feature is enabled, if a booking is created or modified, a message will appear for each booking row which does not have a job code assigned to it.
To enable this feature, please contact NetSuite OpenAir Support and request the "Require Job Code in Dynamic or Advanced Booking Worksheet" feature.
upRetrieve NetSuite vendor credit details for OpenAir as negative purchase items linked to OpenAir projects.
In OpenAir, link vendor credits to an OpenAir project task. When the integration is run, Connector transfers any vendor credits from NetSuite to OpenAir as negative purchase items. OpenAir creates requisitions, purchase orders, or fulfillments where appropriate, which link back to NetSuite. Use charge stage filters to prevent accounted-for charges from being double counted in your general ledger.
Integrate purchase requests on approval in real-time!
This feature also adds the ability to control purchase request integrations through scripting.
To integrate purchase requests on approval in real time:
Go to Administration > Global Settings > Account > Integration: NetSuite and click the "Real-time" tab.
In the "Object" dropdown list, select Purchase Requests. In the "Event" dropdown list, select "Approval".
In the "Active" column, click the toggle button to "On".
Take advantage of NetSuite 2016.2 features.
You can now use the NetSuite 2016.2 communication endpoint in your integrations.
Please see the NetSuite OpenAir NS Connector Guide for more information.
upChange forms quickly and easily with scripts using the new NSOA.form.setvalue command.
Use this command to set form values on the submit scripting event and to update values as part of the main form save, without needing to write WSAPI (SOAP) calls. The effect is the same as a user making manual changes to a field.
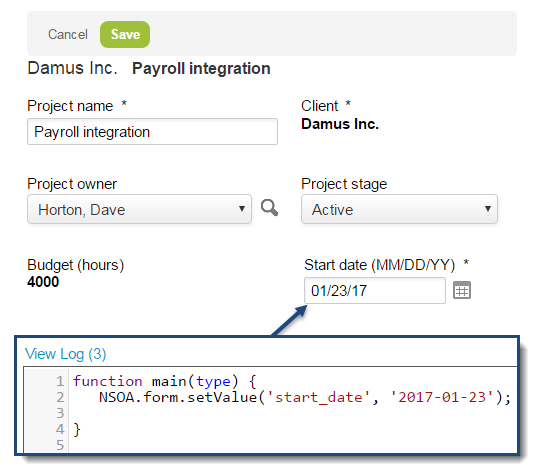
Full validation from your other scripts or rules is applied after the changes are made, ensuring your changes are safe. Form default values are applied before the script is run, and any permission rules or "After save" scripts are applied after the "On submit" script runs.
The function takes two parameters:
The field you want to change
The value to set in the field (either literal or variable)
See how many log entries are part of a log without having to open each log.
This feature shows a count of log entries as part of the "View Log" link for Form and Scheduled Script Deployments.
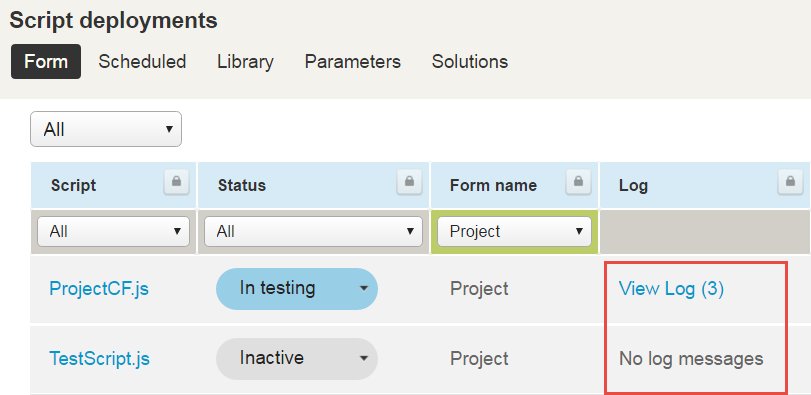
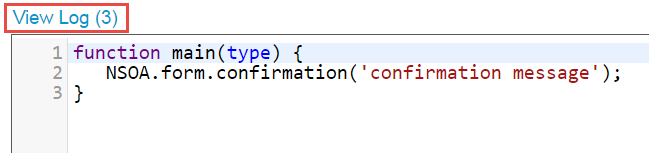
The number of logs also appears next to the "View Log" link in the Scripting Editor.
To use this feature, go to the User Center > Personal Settings > Scripting Studio Options and select the "Display the number of logs at 'View logs' link" option.
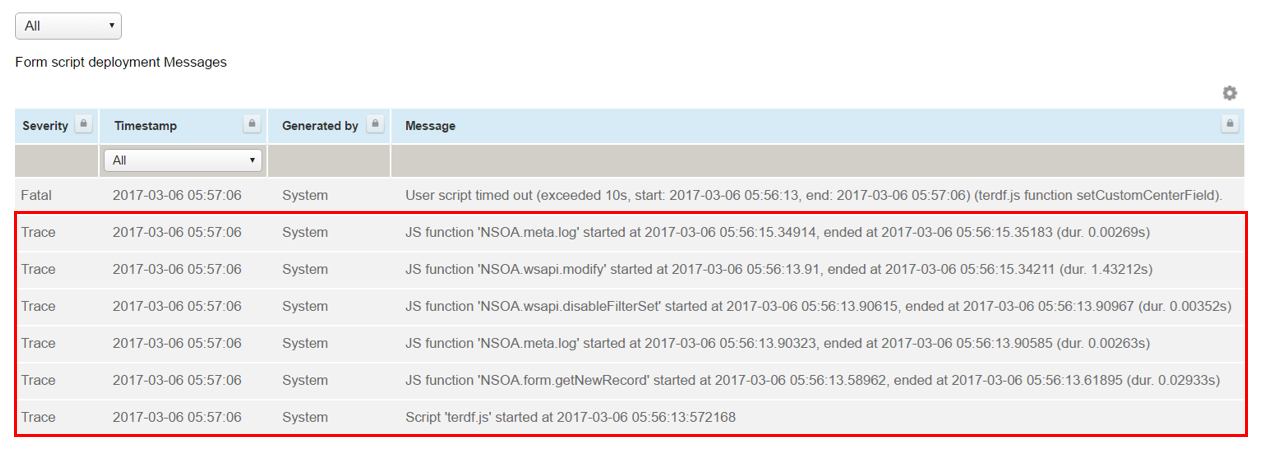
Detailed trace log messages for script timeouts.
Fatal "User script timed out" log messages are now followed by "Trace" log messages which break down the time used in the script to assist you in identifying the root cause of the time out. The log messages indicate the time taken by each function call in the script.
The number of logs also appears next to the "View Log" link in the Scripting Editor.
upTake advantage of an improved process for time entry and a significantly faster workflow with pre-populated forms!
Create timesheets with blank time entries or with entries copied from previous timesheets.
Form defaults from the web application are now respected by the mobile application.

Log into NetSuite OpenAir today to experience these features and much more!
upAs of the April 15, 2017 release, NetSuite OpenAir will no longer support any connections using Windows 2003.
In addition, NetSuite OpenAir will no longer support LDAP connections as of the April 15, 2017 release. LDAPS will continue to be supported.