Enhancements
![]()
Enhancements
Redesigned record header and in-record navigation relocated to the top bar, two new redesigned list views and more...
The OpenAir Help Center includes a new welcome screen, help center updates page, links to recorded training webinars and more...
Project recalculations now run in the background when timesheets are approved.
Create and modify your project plans directly in a new outline view.
Edit text area fields from within inline-editable list views.
Use the icons on the right-hand side of the skills picker to hide or show the skills description.
Custom fields associated with Resource Requests are automatically visible in the Resource Request Queues list view and available for the Resource Request Queues detail report.
Administrators can set the Include PDF invoice as attachment option to be checked by default on the Send Invoice form.
Attached PDF Invoice files are named 'invoice_<invoice number>.pdf'.
Use the NSOA.form.setValue function to set values for dropdown, pick list and radio group fields.
The NSOA.https.put, NSOA.https.patch and NSOA.https.delete functions have been added providing HTTPS PUT, PATCH and DELETE methods to work with external APIs.
Set longer password script parameters and export/import them as part of your platform solutions.
Send a Slack notification when issues are created or (re)assigned using a new platform solution example.
Read, add and modify billing rule filters based on Employee custom fields using the XML API and SOAP API.
Read and modify the billing rule rate override and billing rule rate override currency at the task assignment level with the XML API and SOAP API.
Read the number of hours worked per day using the XML API and SOAP API.
Read the minimum number of hours required and maximum number of hours allowed on the timesheet as set by timesheet rules when reading Timesheets using the XML API and SOAP API.
Delete the user project rate combinations using the XML API and SOAP API.
View the history of integration runs with all the details using the new NetSuite Connector Status screen.
Use the new mapping validation features to ensure your mappings are free from error.
A new Clients (Customers) export workflow lets you create Customer records in OpenAir first and then export them to NetSuite.
The real-time export of Customers, Expenses, Invoices, Purchase Requests, Projects, Tasks and Timesheets from OpenAir to NetSuite now runs in the background.
OpenAir Exchange Manager Version 5.0 supports Microsoft Exchange Server 2016, supports login using session ID, and adds the possibility to run OpenAir Exchange Engine as a Windows Service.
Integration Manager 6.3 supports Intuit Quickbooks 2017/2018/2019
Projects Connector 4.4 supports Microsoft Windows 8.1/10 and Microsoft Project 2013/2016/2019 (32/64 bit)
OpenAir Mobile for Android Version 2.3 supports Identity Provider initiated (IdP-initiated) Single Sign-on (SSO).
OpenAir is very excited to announce our upcoming migration into Oracle Cloud Infrastructure (OCI)!
A new Identity Authentication Service will be deployed in preparation for our move to OCI.
OpenAir will no longer support SHA1 ciphers.
OpenAir will stop supporting LDAPS (secure LDAP) service for authentication effective in April 2020 with OpenAir Release 2020.1
OpenAir desktop applications will stop supporting Microsoft Windows Server 2008/2008 R2 and Microsoft Windows 7 effective on January 14, 2020.
upRedesigned record header and in-record navigation relocated to the top bar, two new redesigned list views and more...
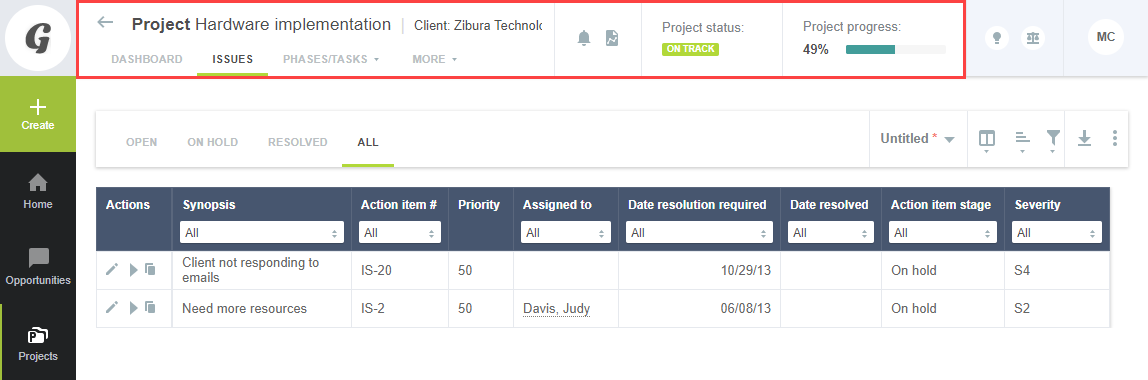
Record screens gain more real estate with a new record header and responsive in-record navigation menu relocated to the top bar. The new record header is available for the following record types:
Bookings
Clients
Employees
Expense report
Guests
Invoices
Projects
Resources
Timesheets
Depending on the record you are viewing it may include the following features:
The record title and sub-title remind you which record you are viewing in the same way as in the old user interface. For example, if you are viewing a Project record, the title and sub-title will be the Project name and the Client name, respectively.
The in-record navigation menu lets you navigate between the different views and tools available for the type of record you are viewing. The in-Record navigation menu is fully responsive and adapts well when viewing the record on tablets or small screens. If there is not sufficient space to display all menu options in the in-record navigation panel, click More to display a vertical continuation menu.
Click the back arrow ![]() in the top left corner to go to the list view for items of the same type as the record you are currently viewing.
in the top left corner to go to the list view for items of the same type as the record you are currently viewing.
The record information panel includes more information about the record you are viewing and quick navigation links to related assets. For example, if you are viewing a Project record, the information panel shows the project progress bar and project status and includes quick navigation links to any assets associated with the project. Such assets may include a Project Status Summary Report ![]() , a Workspace
, a Workspace ![]() , or the Project Status News Feed
, or the Project Status News Feed![]() , if they are configured for the project you are viewing.
, if they are configured for the project you are viewing.
Redesigned list views are now available for Workspaces and in-record Project issues.
This release also improves:
Column filter and column option icons (sort ascending/descending and column lock) for tablet users.
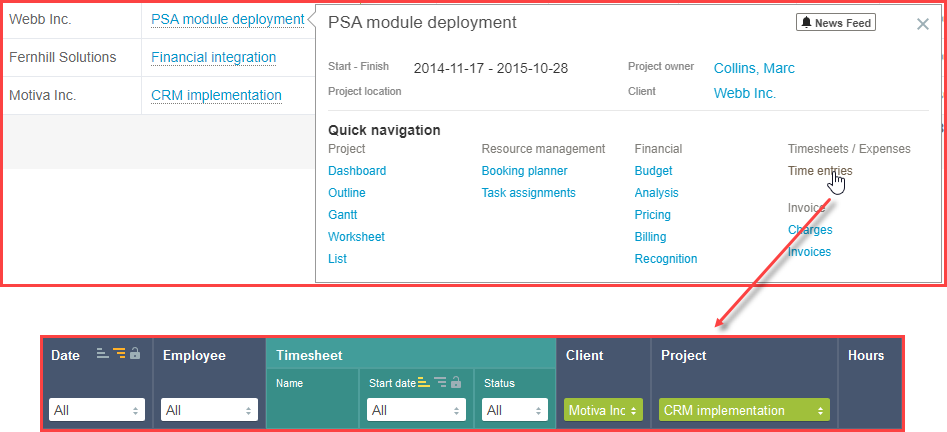
Column filters are now preset when you navigate to a Bookings, Invoices, Charges, Receipts or Time entries list view from QuickViews or from the Booking chart screen.
For example:
The QuickView for a Project will include quick navigation links to Time entries, Receipts, Charges and Invoices list views. Clicking one of these links opens a list view showing only the Time entries, Receipts, Charges and Invoices for that specific Project. The column filters for the Project and Client columns will be preset when the List view is displayed.
The Booking chart lets you see booking data in a visual chart and gives you an overview of bookings for one or more employees. Clicking on a bar in the chart opens the Bookings list view listing only the bookings for the selected Resource, or all bookings, for a specific period of time. The column filters for the Resource, Start date and End date columns will be preset when the List view is displayed.
This release improves the general navigation and in-record navigation under NetSuite SSO.

The "Add multiple profiles" optional feature is not supported when Redesigned OpenAir User Experience Phase 3 is enabled. This feature is now replaced with the "Consolidated resource profiles" optional feature. Contact OpenAir Support to enable this feature.
A user guide introducing the redesigned OpenAir user experience is now available both in PDF format and in the OpenAir Help Center. Download the OpenAir Redesigned User Experience Guide.
Note: The redesigned OpenAir user experience is being released in phases. Phases 1 and 2 must be enabled to take advantage of the above features. Phase 3 must also be enabled for the additional list views. Contact OpenAir Support to enable these features.
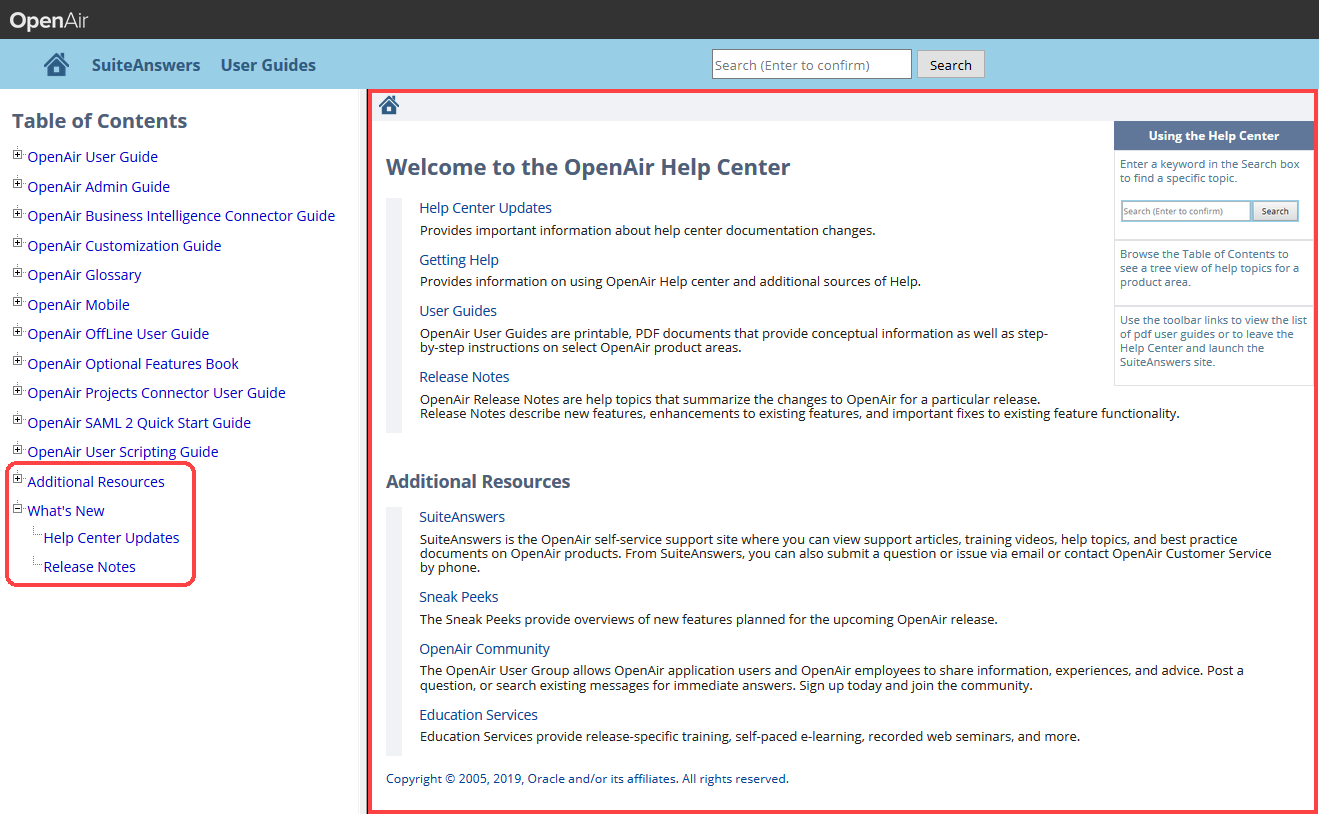
The OpenAir Help Center includes a new welcome screen, help center updates page, links to recorded training webinars and more ...
When you navigate to the OpenAir Help Center, you will now see a welcome screen with direct links to useful help topics and other resources, including:
Help center updates — Starting from the 2019.2 release of OpenAir, this page will list the changes made to each updated version of the help center. Visit this page regularly to find out about changes to the help topics in the OpenAir Help Center.
Release notes — Starting from the 2019.2 release of OpenAir, this page will link to the release notes for the latest release of OpenAir. It will also include notes about product enhancements made since the last release. Visit this page regularly to find out about new features, product enhancements and add-on application releases.
Getting Help — Overview of OpenAir documentation and support resources. Visit these pages to find out about the OpenAir Help Center, SuiteAnswers and OpenAir PDF user guides.
User Guides — A list of all OpenAir PDF user guides with direct links to view/download the guides.
The navigation pane on the left includes two new headings:
What's New — Click or expand this section heading to navigate to the Help Center Updates or the Release Notes.
Additional Resources — This section contains links to recorded training webinars and more.
Note: Contact OpenAir Support to enable the OpenAir Help Center feature. Go to Administration > Global Settings > Users > Roles > [Select a role] > General Settings and select the "View Help Center" role permission to grant access to the OpenAir Help Center for that user role.
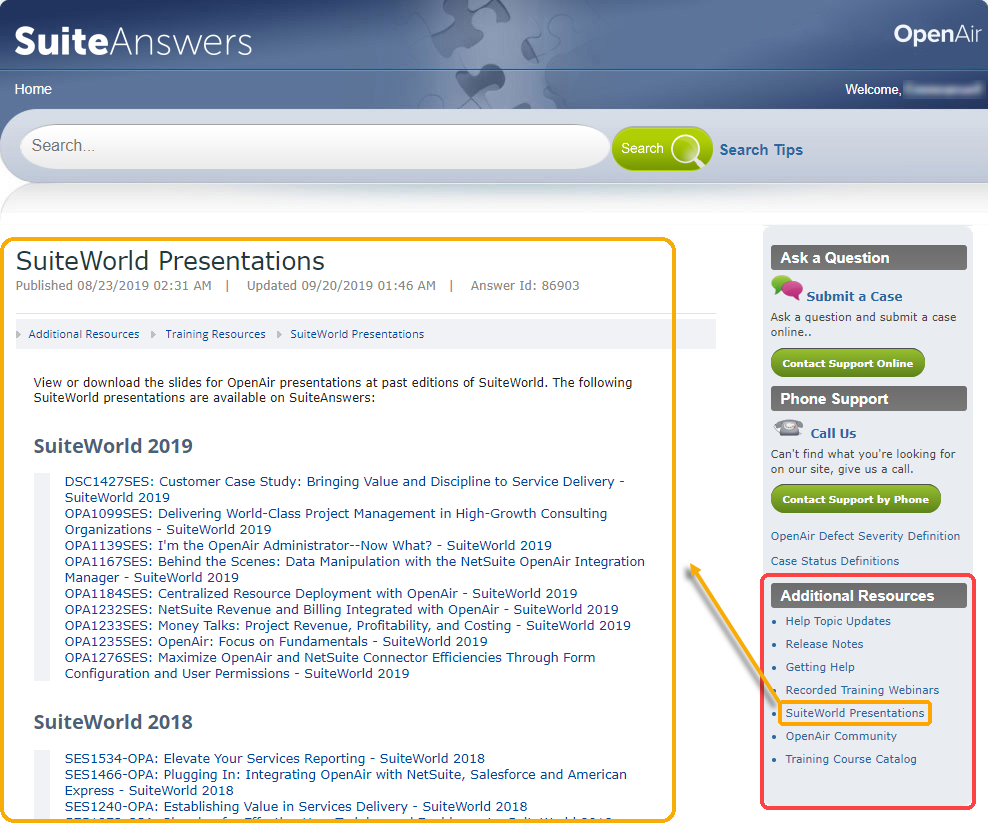
These additional resources are also available in SuiteAnswers. A new Additional Resources panel is available on the right-hand side with links to help topic updates, release notes, getting help and other resources. Two new help topics provide a list of recorded new feature training webinars for this and previous releases, and a list of OpenAir presentations given in recent editions of SuiteWorld and newly available on SuiteAnswers for OpenAir users.
up
Project recalculations now run in the background when timesheets are approved.
When approving timesheets, users no longer have to wait until the project and task recalculation finishes to receive notification that the approval was succesful and continue working.
upCreate and modify your project plans directly in a new outline view.
A new outline view within project records lets you create and modify your project plans directly in the list view.
This is the first instalment in the phased release of the Project Center feature, which aims to provide you with the tools to manage key project activities from a single screen.
Access to the Project Center feature is controlled by role permission, once the feature is enabled on your account. Go to Administration > Global Settings > Roles > [Select a Role] and select View Project Center in the role permission form under Projects.
Once the feature is enabled and the appropriate role permission granted:
A new tab becomes available in the in-Record navigation menu when you navigate to a Project record. Click Project Center to display the Project Center Outline view.
Inline-editing in list views is available in the Project Center Outline.
Add new phases, tasks and milestones to your project plan without having to open a form. Click the Add New icon
![]() next to a phase or a next to the project root to insert a new entry. The new entry will be nested immediately under the phase or the project root.
next to a phase or a next to the project root to insert a new entry. The new entry will be nested immediately under the phase or the project root.
Drag individual tasks and milestones or entire phases to change the sequence of your project. You can insert the entry after another entry, before another entry or into a phase. As you drag the selected entry, notice the green line between the rows and the highlighted text in the row either above (insert after) or below (insert before), or the entire row displaying with a green color background (insert into).
Click the More icon ![]() in the Actions column and select Delete to delete an entry. Any entries nested under the deleted entry will move up one level. For example, if you delete one of the main phases nested under the project root, all the sub-phases, tasks and milestones that were nested under that deleted phase will now be nested under the project root.
in the Actions column and select Delete to delete an entry. Any entries nested under the deleted entry will move up one level. For example, if you delete one of the main phases nested under the project root, all the sub-phases, tasks and milestones that were nested under that deleted phase will now be nested under the project root.
If you add a new entry, use inline-editing to update an item or delete an entry, a message appears confirming the record was saved or deleted successfully. Form scripts associated with the project phase, task or milestone will be triggered when updating a record directly from the Project Center Outline View.
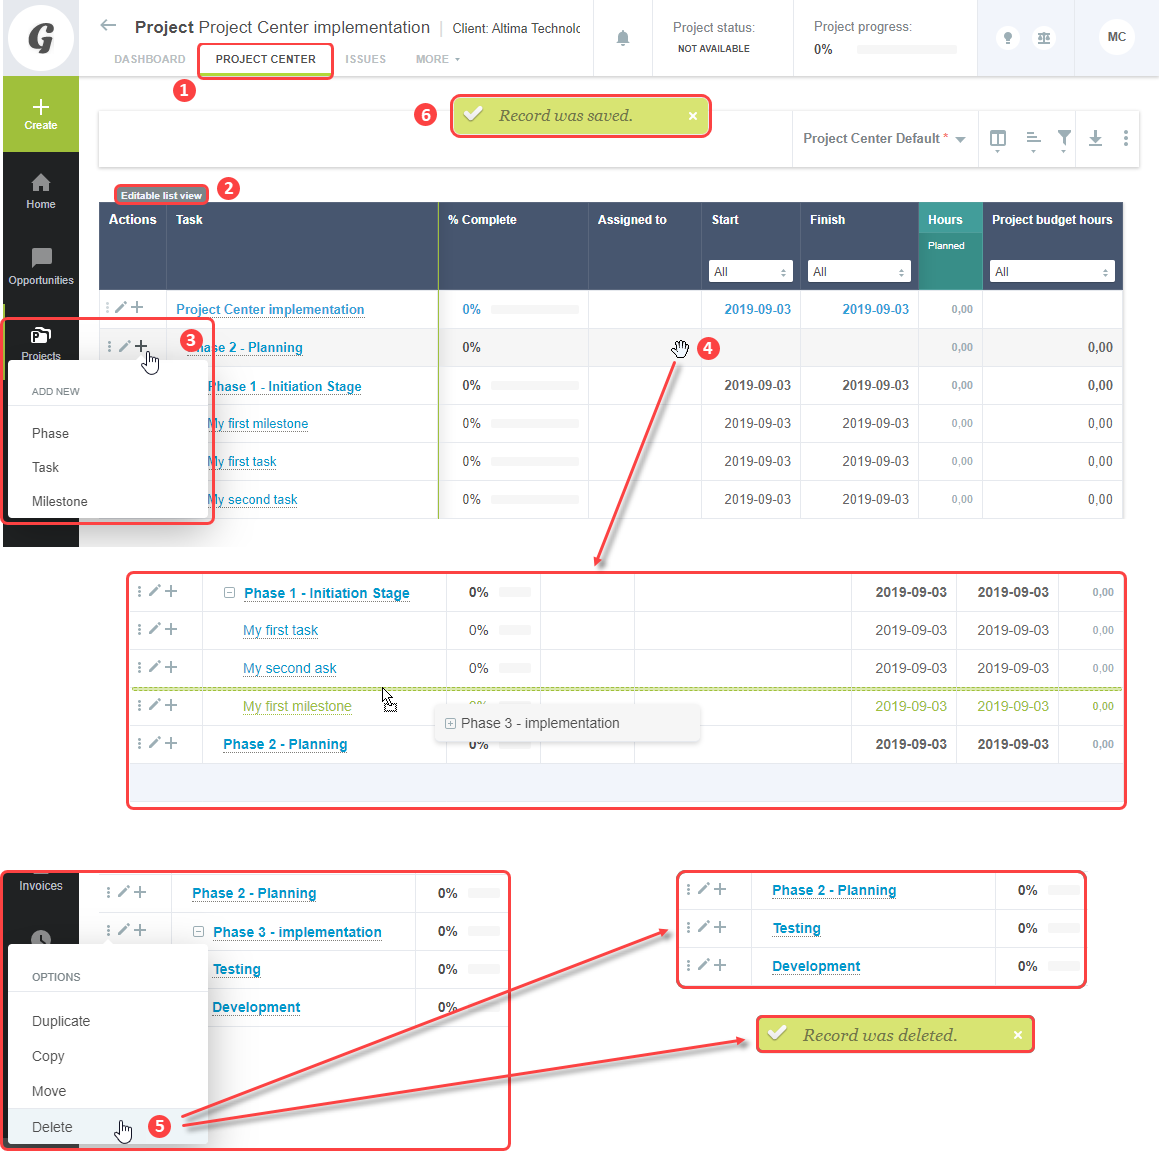
Note: The following optional features must be enabled to use the new outline list view: Redesigned OpenAir User Experience Phase 2, Inline-editing in list views and Project Center. Contact OpenAir Support to enable these features.
Edit text area fields from within inline-editable list views.
Double-click the field to edit it. Drag the bottom right corner to resize the box. Press Shift + Enter to insert a line break. Press Enter to validate your change and move to the next row in the list or use Tab and Shift + Tab to navigate along the row.
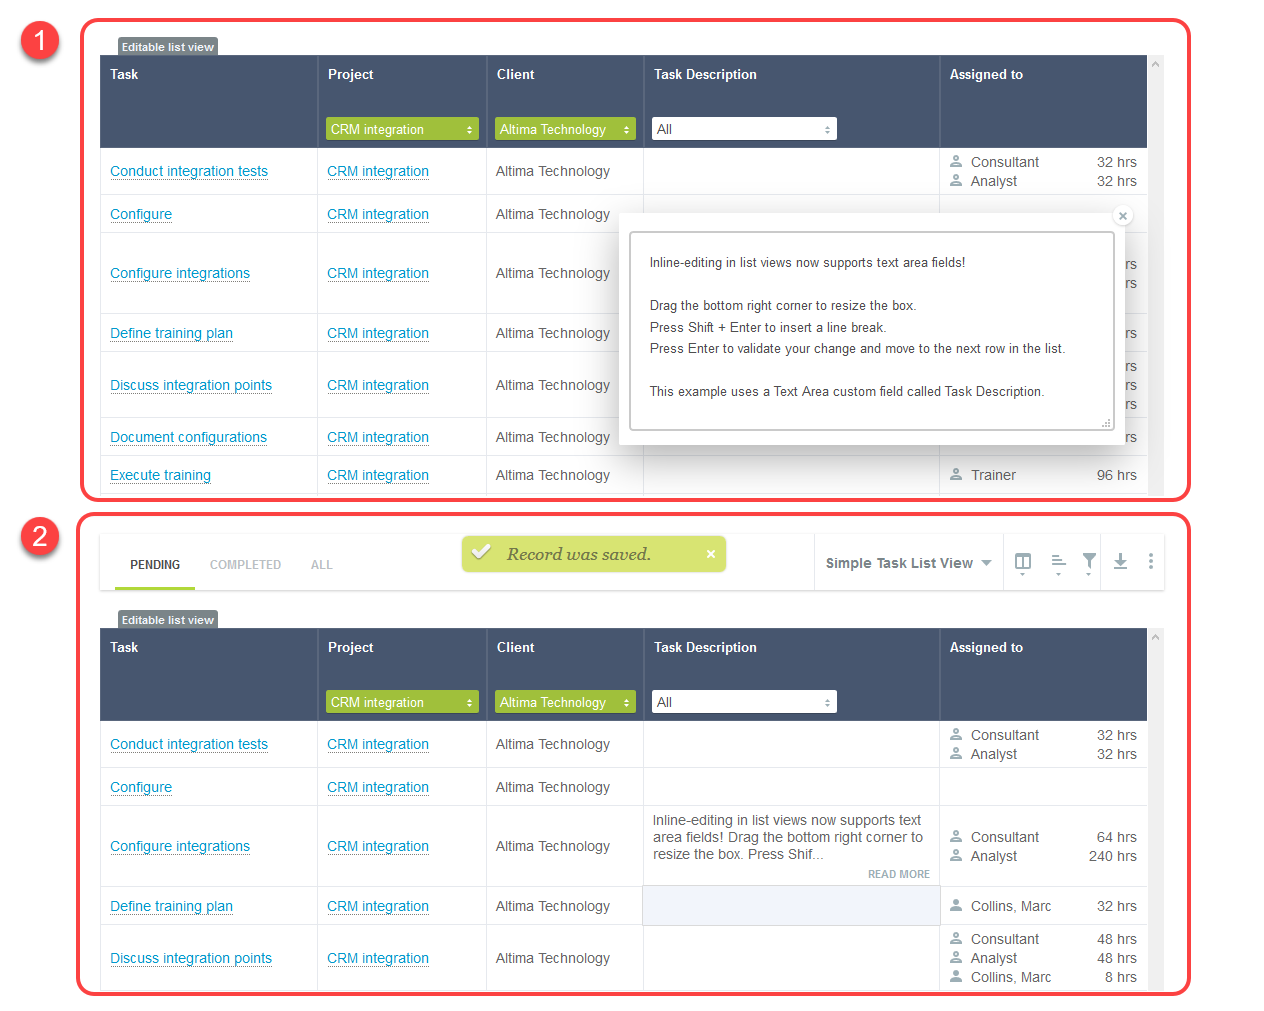
Note: The following optional features must be enabled to use this feature: Redesigned OpenAir User Experience Phase 2 and Inline-editing in list views. Contact OpenAir Support to enable these features.
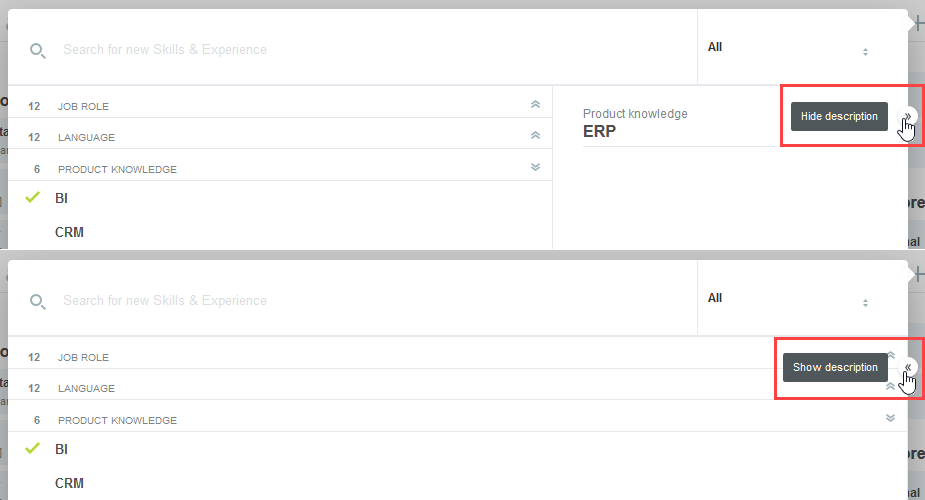
upUse the icons on the right-hand side of the skills picker to hide or show the skills description.
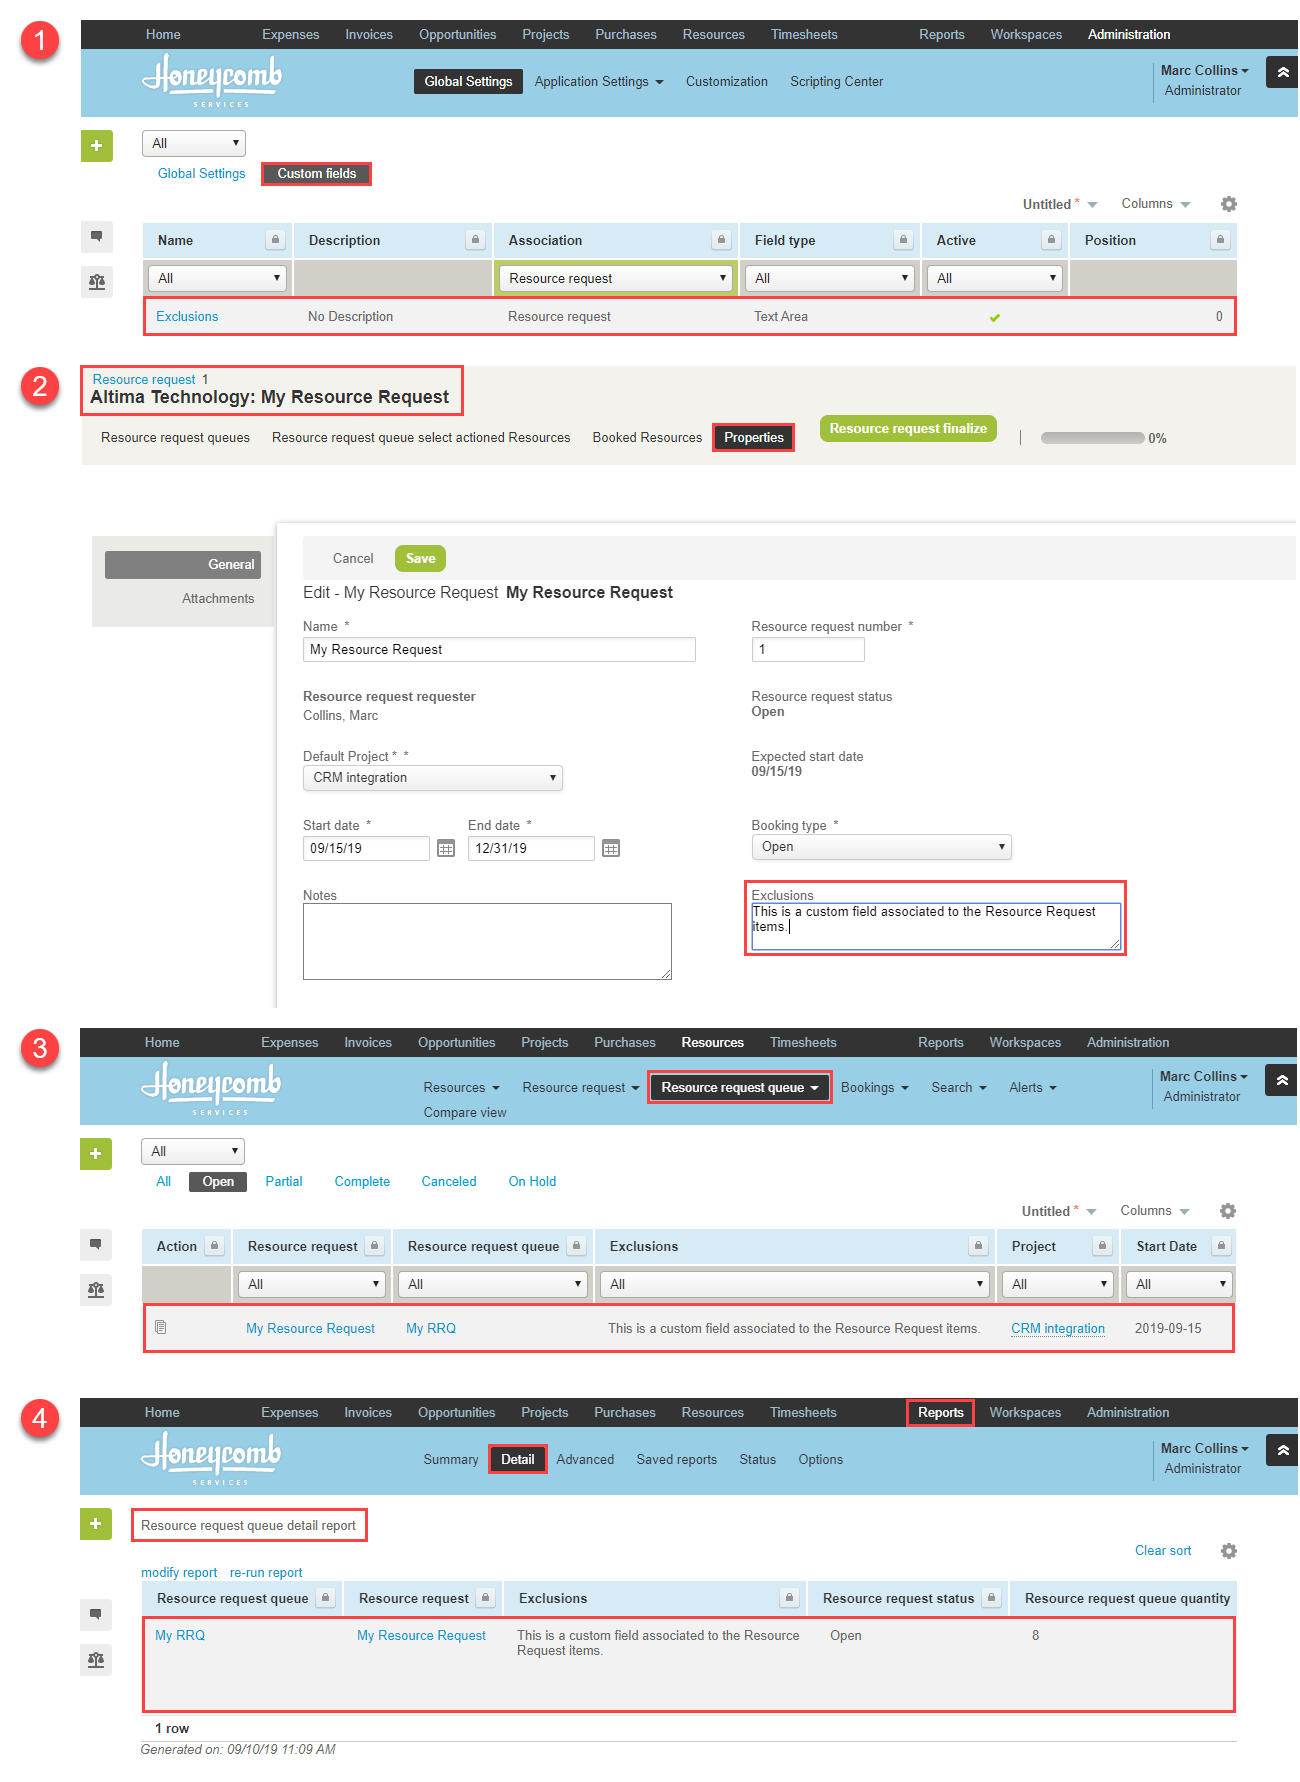
Custom fields associated with Resource Requests are automatically visible in the Resource Request Queues list view and available for the Resource Request Queues detail report.
up
Administrators can set the Include PDF invoice as attachment option to be checked by default on the Send Invoice form.
Go to Administration > Application Settings > Invoices Settings > Invoices Options and select the Include PDF by default when sending an invoice checkbox.
When users navigate to the Send form in the Invoices application, the Include PDF invoice as attachment option will be checked by default. Users will be able to uncheck this option if they do not want to include the invoice as a PDF attachment.
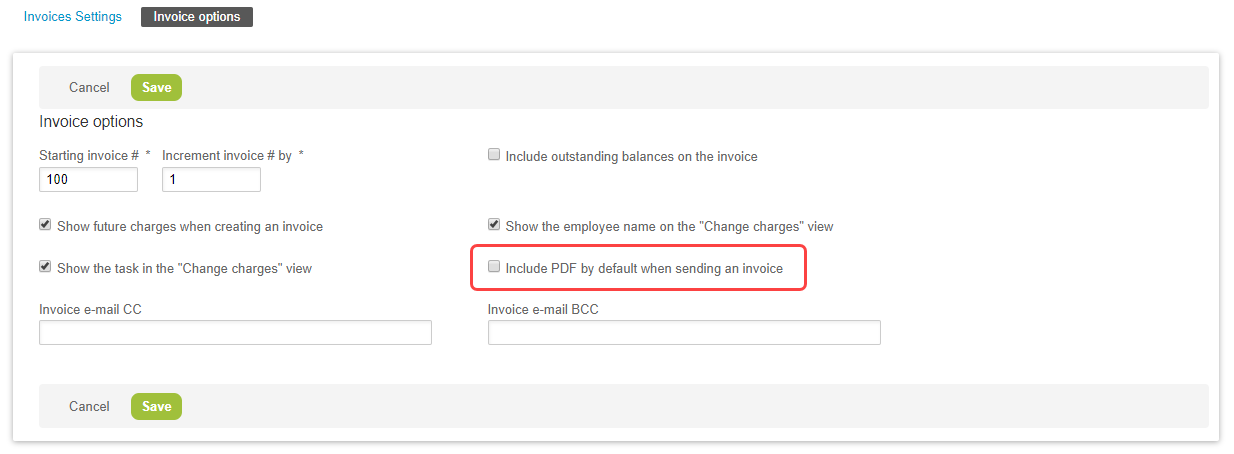
Attached PDF Invoice files are named 'invoice_<invoice number>.pdf'.
For example, Invoice number 1358 will be sent with the file 'invoice_1358.pdf' in attachment.
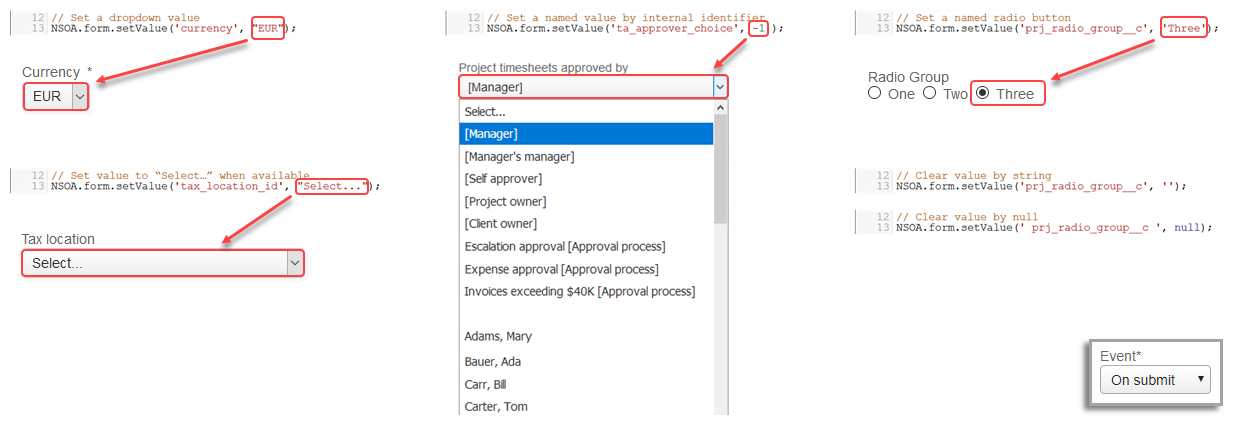
upUse the NSOA.form.setValue function to set values for dropdown, pick list and radio group fields.
The NSOA.form.setValue function now also supports the following field types:
Dropdown — Set a dropdown (or dropdown and text field) field value using one of the values displayed in the dropdown options. Set the value to "Select ..." to clear any selected value.
Pick list — Set the pick list field value by its internal identifier. Pick list meta values e.g. [Manager] are also supported. Set the value to "BLANK" to clear any selected value.
Radio group — Set a radio group field value by the radio button name. Set the value to "" or to null to clear any selected value.
Important: Setting an invalid radio button name will clear the radio button group. The radio button names are case sensitive.
The NSOA.https.put, NSOA.https.patch and NSOA.https.delete functions have been added providing HTTPS PUT, PATCH and DELETE methods to work with external APIs.
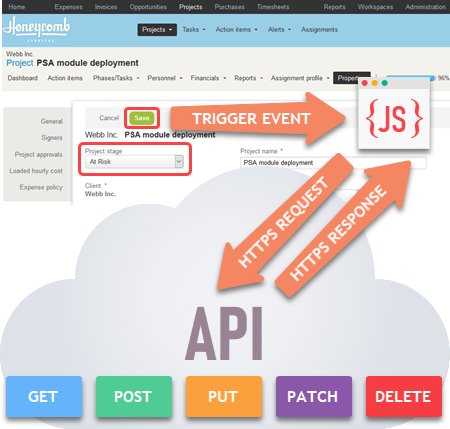
Note: The following optional features must be enabled to use this feature: Enable user script support for https methods. Contact OpenAir Support to enable these features.
Set longer password script parameters and export/import them as part of your platform solutions.
The password script parameter has been extended allowing you to store longer encrypted credentials and use them in your scripts for secure deployment and maintenance.
Password script parameters are now saved in platform solutions.
See the OpenAir User Scripting guide for more information about using script parameters and platform solutions.
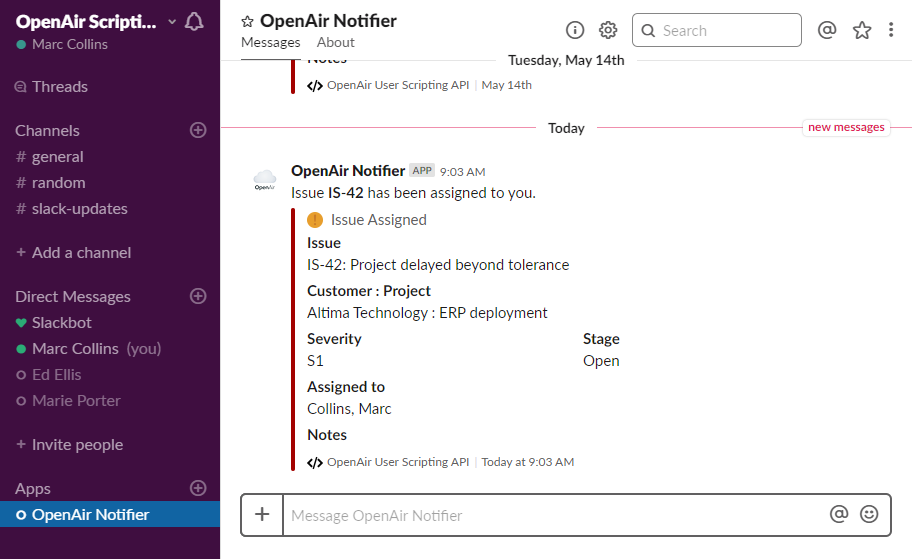
Send a Slack notification when issues are created or (re)assigned using a new platform solution example.
The script sends a notification on a specified Slack channel whenever an issue is created or modified. It also sends a direct message from the Slack app bot to notify employees whenever an issue has been assigned to them.
The platform solution uses Password script parameters to store a webhook and an authentication token securely. It also uses the NSOA.https.get() and NSOA.https.post() functions.
Find this real world use case example in the OpenAir User Scripting guide.
Read, add and modify billing rule filters based on Employee custom fields using the XML API and SOAP API.
The extra_data field is available when using the XML API or SOAP API to read, add, or modify the Projectbillingrule type. The extra_data field holds additional data associated with the project billing rule. This includes information about Billing rule filters set to use custom fields to limit the billing rule to specific employee.
Note: Time, Expense and Purchase billing rules support the use of Employee custom fields as billing rule filters.
For more information, see the description of the Projectbillingrule type in OpenAir SOAP API Reference Guide or OpenAir XML API Reference Guide
Read and modify the billing rule rate override and billing rule rate override currency at the task assignment level with the XML API and SOAP API.
When the "Enable billing rule rate override at the task assignment level" internal switch is enabled, you are able set billing rates for users assigned to the task and override the time billing rule. You can set the billing rule rate override and billing rule rate override currency fields using the XML API and the SOAP API. The billing rule rate override currency field may be set to any currency specified in Administration > Global settings > Currencies > Multi-currency (if multi-currency is enabled on your account) and defaults to the Company's base currency currency, if not set.
Read the number of hours worked per day using the XML API and SOAP API.
Read the minimum number of hours required and maximum number of hours allowed on the timesheet as set by timesheet rules when reading Timesheets using the XML API and SOAP API.
Set the attribute calculate_hours to '1' when sending a read request using the XML API or the SOAP API to return the min_hour and max_hour calculated fields in the Timesheet type. The minimum number of hours required on the timesheet (min_hour) and/or maximum number of hours allowed on the timesheet (max_hour) may be set as fixed hours or as a percentage of the work schedule in Administration > Application settings > Timesheet Settings > Timesheet rules. Values are returned for these fields only if the corresponding rule is active.
Important: Using the attribute calculate_hours may slow the response time significantly, particularly if the Timesheet rules are active and set to ‘Percent of work schedule’.
Delete the user project rate combinations using the XML API and SOAP API.
User project rate combinations are used for Project Billing when the Time billing rule is set to get the billing rates from Employees and to override any of the employee rates.
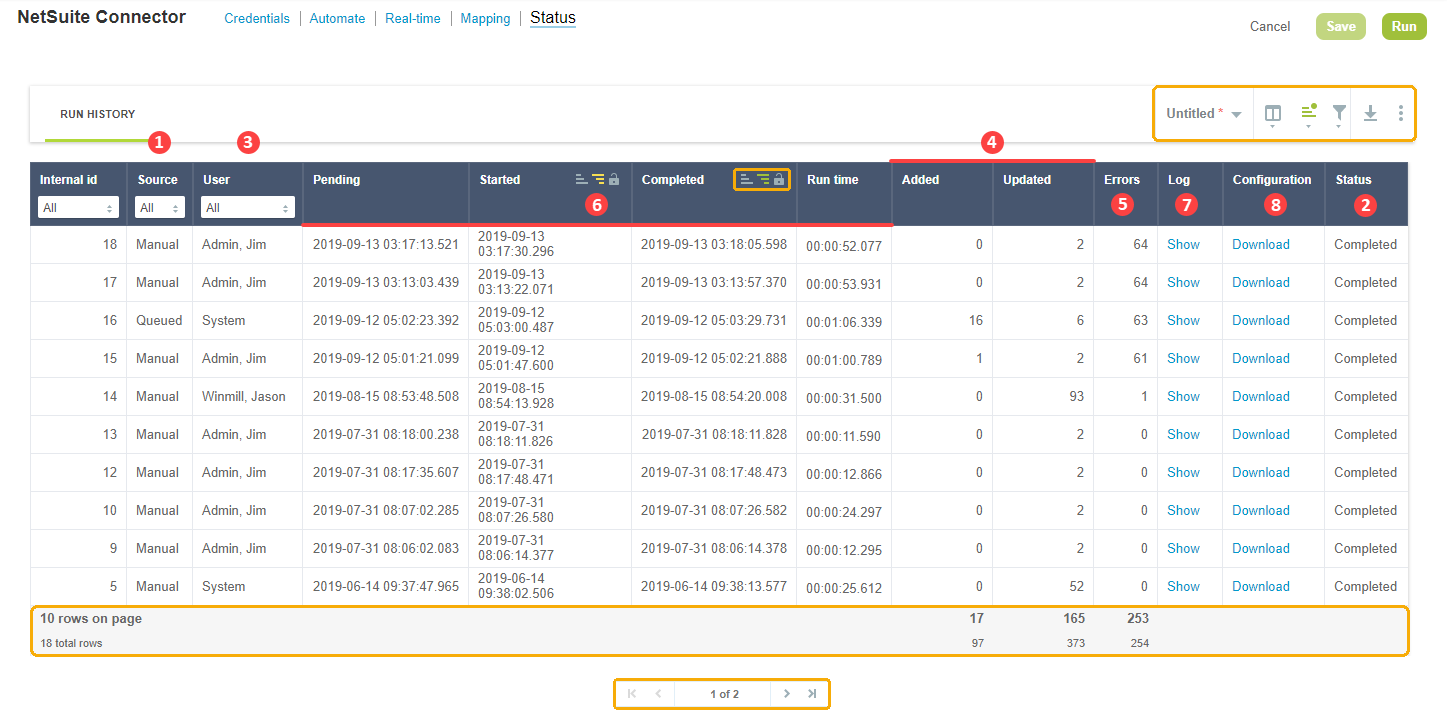
upView the history of integration runs with all the details using the new NetSuite Connector Status screen.
Go to Administration > Global Settings > Integration: NetSuite > Status to display the NetSuite Connector Status screen.
The Status screen is a list view of integration runs. It uses the redesigned user experience layout and supports the features of the redesigned list views.
The following integration run details are available:
Source — How the integration run was started (Automated/Manual/Queued/Real-time import/Scripting).
Status — The status of the integration run (Pending/Running/Completed)
User — The name of the user who started the integration run or "System" if the integration run was started automatically.
Added and Updated — The number of records that were added and updated in the integration run.
Errors — The number of errors that occurred in the integration run.
Pending, Started, Completed, and Run time — Time stamps indicating when the the integration run was queued, when it started and when it completed, as well as the duration of the integration run.
Log — Link to the log for that particular integration run. Click Show to display the log.
Download — Link to download the configuration details used by that particular integration run. Click Download to save the configuration for that integration run as a JSON file on your computer.
The integration run log is displayed in a pop-up window and includes two tabs:
Click the Text View tab to display summary information about the integration run, which includes:
The unique integration run identifier
The time taken to completethe integration run
Account / connection details
Summary of records integrated
Integration messages
Click the Table View tab to display a list view with key details of records integrated in the run, which includes:
Object — The type of record integrated
Status — The outcome of the integration or the current status if the integration has not completed.
Message — Information message
OpenAir id — OpenAir unique identifier for the integrated record
NetSuite id — NetSuite unique identifier for the integrated record
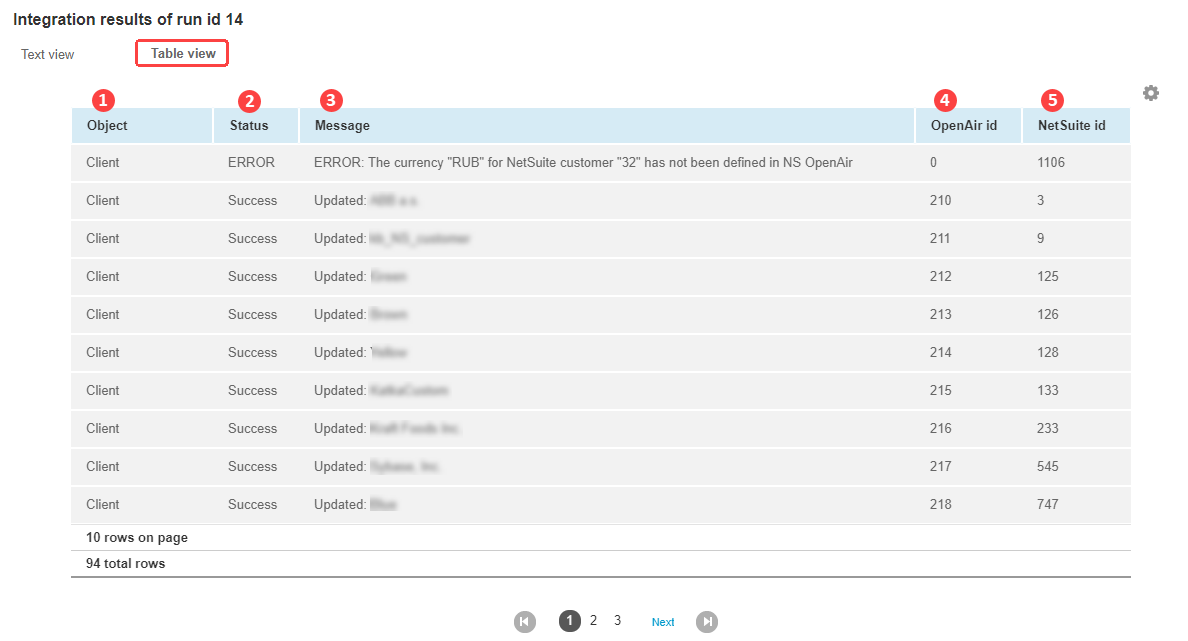
Note: The usual list view features are supported for both the status screen and the logs for individual runs. For example, you can use the download feature to save the list view data as a CSV, HTML or PDF file.
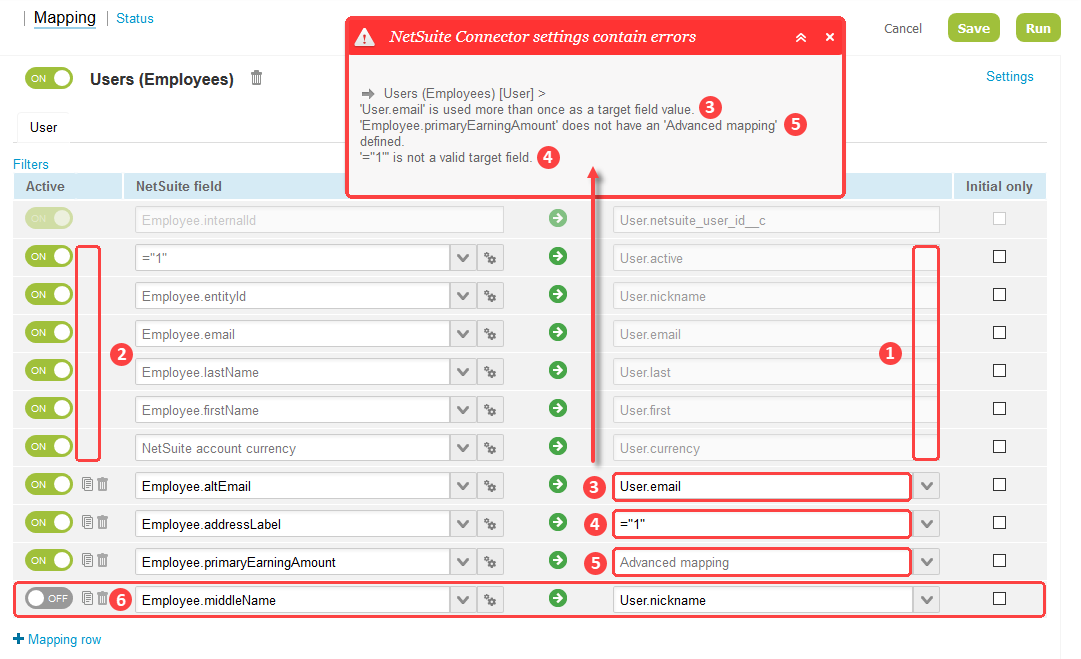
Use the new mapping validation features to ensure your mappings are free from error.
There are now three ways to validate your integration mapping definitions in the NetSuite Connector user interface:
Default validation
New Tips menu option to Validate mapping
New Integration admin setting to Enable Strict mapping validation
Different restrictions apply to different types of field mapping:
Required field mappings are set by default and cannot be disabled or modified. The entire row appears faded with text in light gray color on the mapping screen.
Default field mappings are set by default. They cannot be deleted but allow the following changes:
Disable the field mapping by clicking the toggle in the Active column.
Set the source to a different value or use advanced mapping.
Check the Initial only option to use the field mapping to update the field value in the initial integration run only.
If you set the target to a different value and save the configuration. The default field mapping will be restored to its original definition and the repurposed default field mapping will be saved as a new custom field mapping. Refresh the screen to display the changes on the mapping screen.
Custom — Custom field mappings are defined by customers. The following field mappings are invalid and will be ignored:
The target field is blank.
The target field is a constant.
Duplicate target fields. If two or more otherwise valid field mappings have the same target field, only the last one will be used. Any field mapping defined in of the rows above with duplicate target fields will be ignored.

Click the Validate mapping link in the Tips menu to check all active mappings. This feature let you:
Verify that all enabled mapping rows for all enabled workflows meet strict validation criteria.
Validate the mapping without having to save your NetSuite Connector configuration.
Identify any errors with easy-to-follow validation messages indicating:
the workflow
the tab
for every mapping row:
the target field
an error message
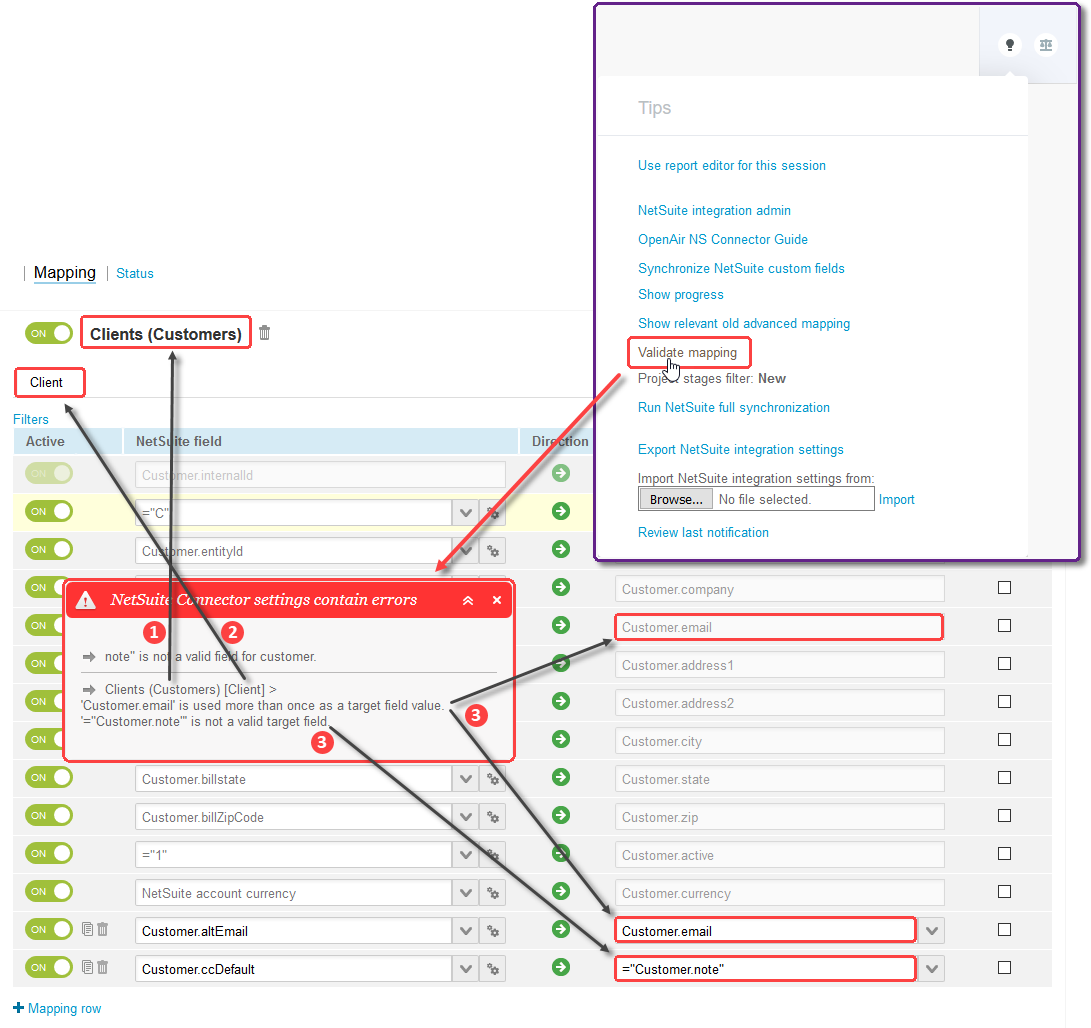
Note: Only the active mapping rows in the active workflows are included in the validation. The validation skips any workflow or mapping row with the Active toggle switched OFF.
A new setting in the NetSuite integration administration form let you enforce front-end mapping validation. Contact OpenAir Support and ask for the Enable strict mapping validation integration admin setting to be enabled.
Once enabled, the strict mapping validation will:
Prevent changes to the target field for default field mappings — the dropdown is no longer available.
Prevent duplication of default field mappings — the copy icon ![]() is no longer available.
is no longer available.
Prevent duplicated target fields — a validation error message will appear if you attempt to save the configuration and the mapping includes a duplicated target field.
Prevent setting the target field to a constant value — a validation error message will appear if you attempt to save the configuration and a target field is set to a constant.
Prevent blank target fields — the target field is set to "Advanced mapping" by default and a validation error message will appear if you attempt to save the configuration and an Advanced mapping is not defined.
Ignore any mapping rows with the Active toggle switched OFF.
A new Clients (Customers) export workflow lets you create Customer records in OpenAir first and then export them to NetSuite.
Contact OpenAir Support and ask for the Enable Client export to NetSuite integration admin setting to be enabled. A new Clients (Customers) export workflow becomes available in the NetSuite Connector Mapping screen once the feature is enabled. The workflow supports both integration on-demand using the Export to NetSuite link in the Tips menu and real-time integration.
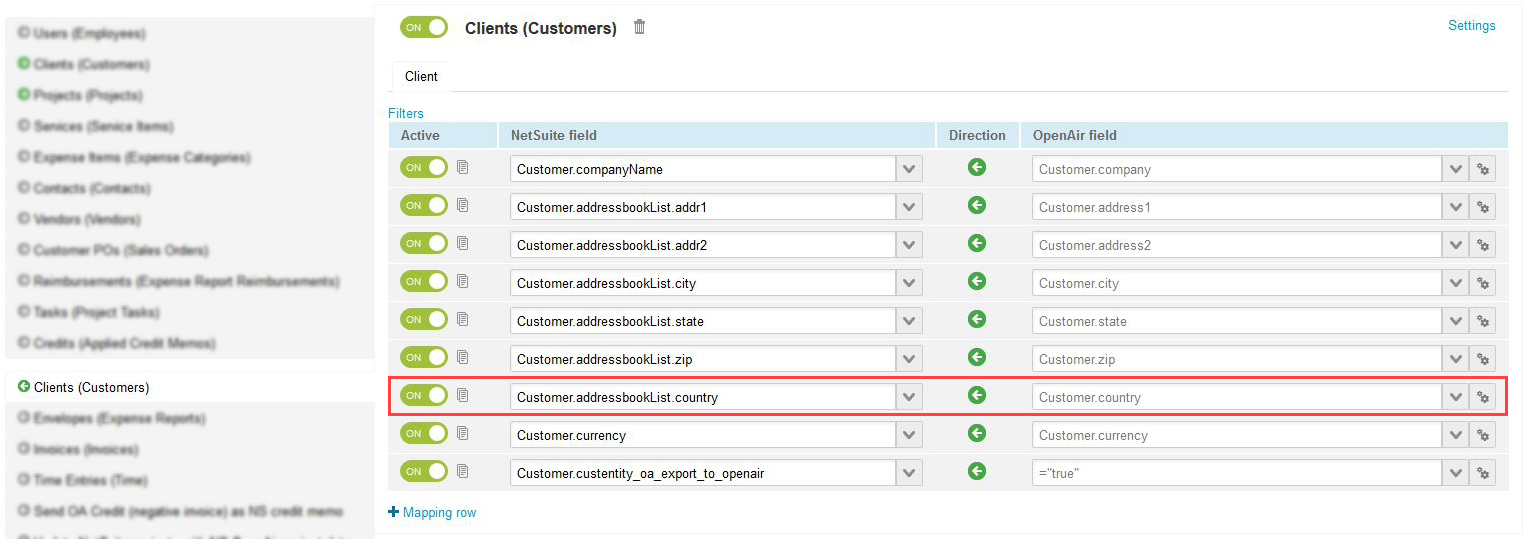
The mapping row for the Country field is disabled by default. To enable it, click Settings and select Map country when exporting clients to NetSuite.

Note: It is not possible to map the Country field manually.
Enabling the Clients (Customers) workflow also adds an Export to NetSuite option to each Client form. When the integration runs, it performs an Add request to NetSuite (in the same manner as Enable 3-way Salesforce.com, NS OpenAir and NetSuite integration) for each client marked Export to NetSuite.
Note: A warning appears when users attempt to export manually an already integrated Client record.
Important: This feature is mutually exclusive with Enable 3-way Salesforce.com, NS OpenAir and NetSuite integration.
The Projects (Projects) export workflow lets you export projects to NetSuite in real-time when you create or update projects in OpenAir.
The following NetSuite integration administration settings need to be enabled to use this feature: Enable Project export to NetSuite, Export NS OpenAir project data to existing NetSuite projects, and Enable NetSuite real-time integration. Contact OpenAir Support to enable these integration admin settings.
Once the feature is enabled, you can set NetSuite Connector to export automatically new/ existing project records created/updated in OpenAir to NetSuite when hitting Save on the Project form.
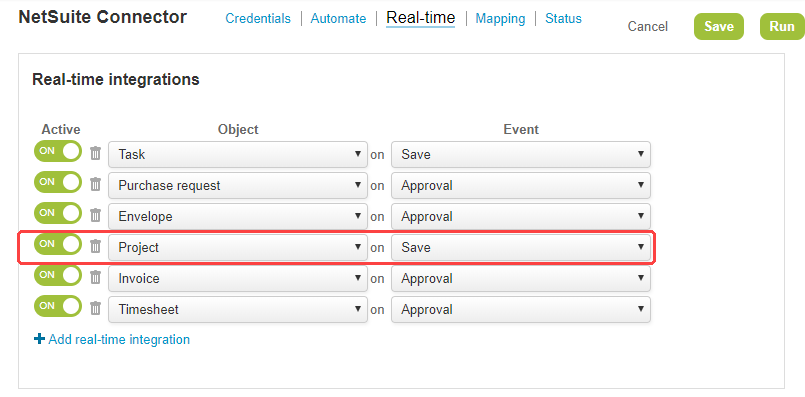
The real-time export of Customers, Expenses, Invoices, Purchase Requests, Projects, Tasks and Timesheets from OpenAir to NetSuite now runs in the background.
When saving, approving or running an action on records, either individually or in bulk, users no longer have to wait until the export finishes to receive notification that the action was successful and continue working. An email is sent to the administrator in case of an integration error.
upOpenAir Exchange Manager Version 5.0 supports Microsoft Exchange Server 2016, supports login using session ID, and adds the possibility to run OpenAir Exchange Engine as a Windows Service.
Go to the Taskbar system tray, locate and the right-click the OpenAir Exchange Engine Monitor icon ![]() and click Install Service. Once the service installed, right-click the OpenAir Exchange Engine Monitor icon
and click Install Service. Once the service installed, right-click the OpenAir Exchange Engine Monitor icon ![]() and click Start Service or Stop Service to control the service, or click Stats to open the OpenAir Exchange Monitor window and review the status and activity of the OpenAir Exchange Engine Windows service.
and click Start Service or Stop Service to control the service, or click Stats to open the OpenAir Exchange Monitor window and review the status and activity of the OpenAir Exchange Engine Windows service.
You can start/stop the OpenAir Exchange Integration Manager Engine service from the Windows Services Manager.
You can now resize the Integration Settings window in the OpenAir Exchange Setup. This makes it easier to select a project in the Default Booking Properties dropdown, for example, as long project names can now be displayed in full.
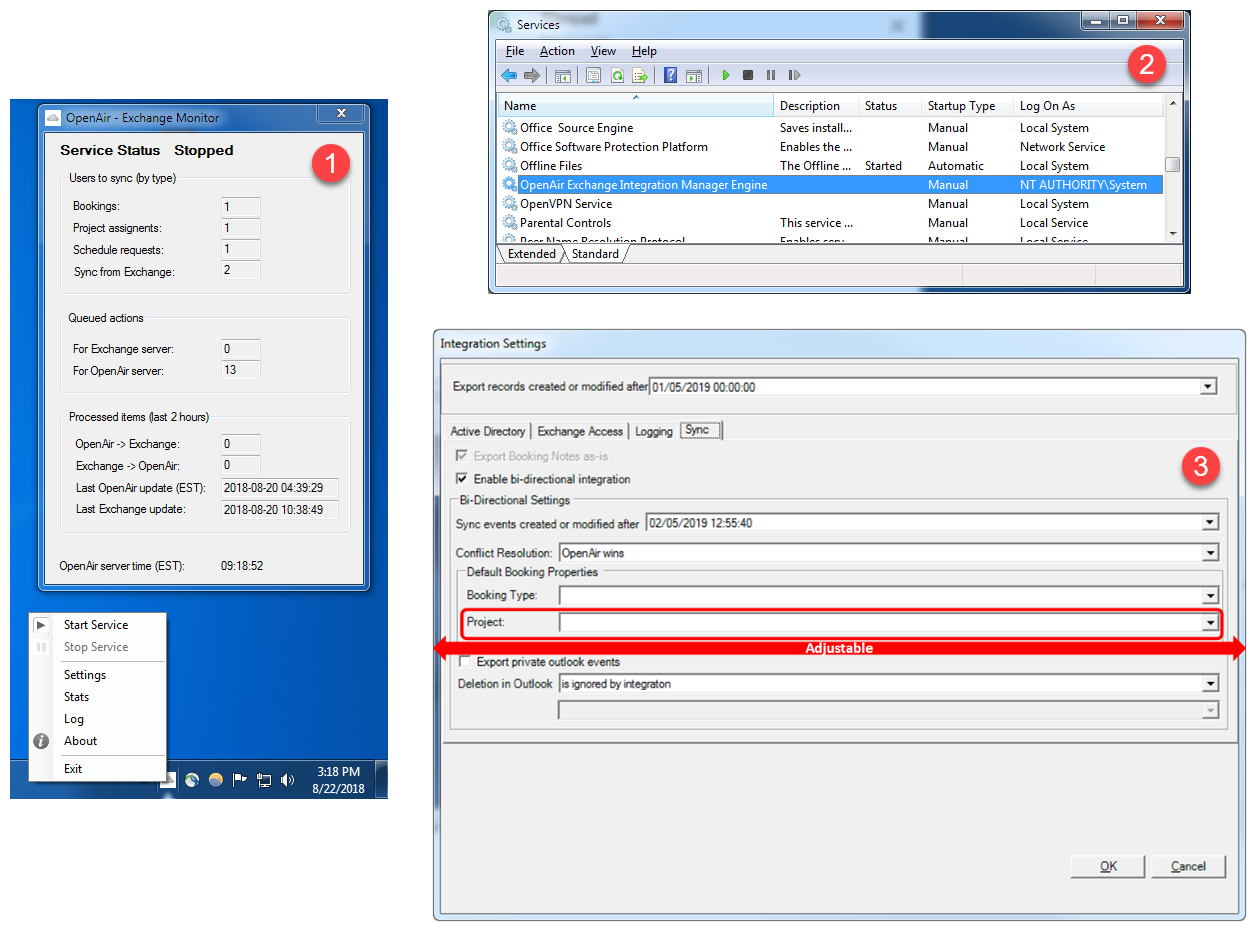
Important: OpenAir Exchange Manager will stop supporting Microsoft Windows Server 2008 and 2008 R2 effective on January 14, 2020. You will need to upgrade to MS Windows Server 2012, 2012 R2, 2016 or 2019. See Service Changes Impacting Infrastructure.
Integration Manager 6.3 supports Intuit Quickbooks 2017/2018/2019
Integration Manager 6.3 requires Microsoft Windows Server 2012 or later or Microsoft Windows 8 or later.
Important: OpenAir Integration Manager supports versions of QuickBooks 2017 or later. Earlier versions are no longer supported. Intuit ended support for Quickbooks 2016 on May 31, 2019. You will need to upgrade to Quickbooks 2017..
Projects Connector 4.4 supports Microsoft Windows 8.1/10 and Microsoft Project 2013/2016/2019 (32/64 bit)
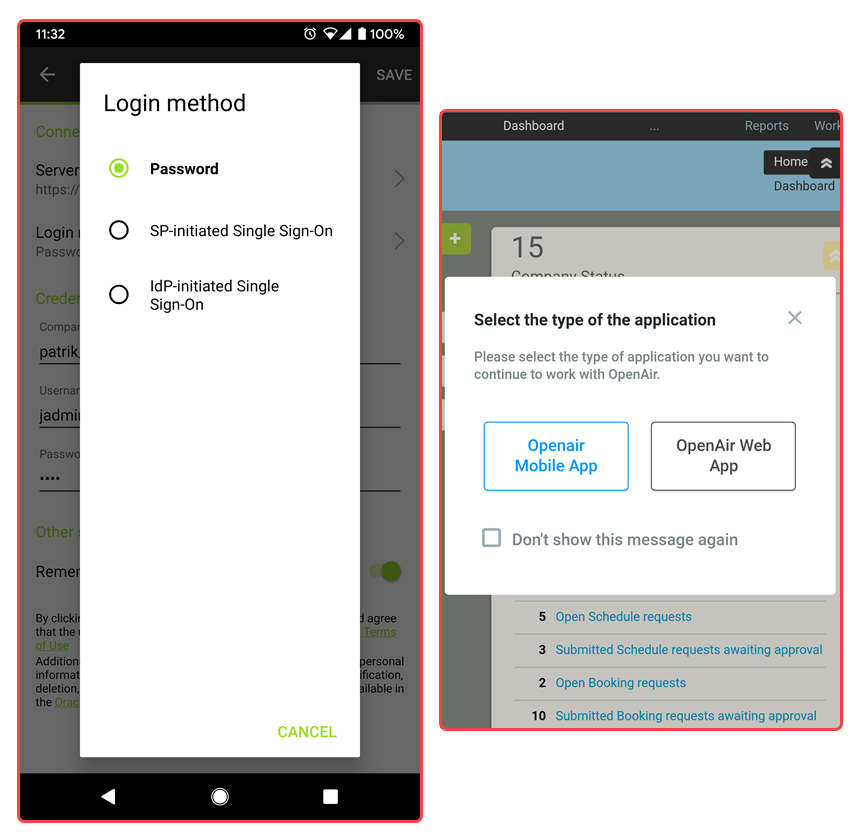
OpenAir Mobile for Android Version 2.3 supports Identity Provider initiated (IdP-initiated) Single Sign-on (SSO) and separate access control to the Timesheets and Expenses modules on OpenAir Mobile.
Use SSO to log into OpenAir Mobile whether your environment supports Service Provider initiated (SP-initiated) SSO or not.
If SAML SSO is configured on your OpenAir account and you log into the OpenAir web application using a mobile browser on your Android phone, a dialog window appears prompting you to choose between the native OpenAir Mobile application or the OpenAir web application to continue working with OpenAir.
To disable this dialog for future sessions, select the Don’t show this message again option.
Note: If the Don’t show this message again option is checked, your preference will be saved and will apply every time you start an OpenAir session using IdP-initiated SSO. You can change this preference at any time by navigating to the OpenAir web application and tapping the Open OpenAir Mobile App link from the Tips menu.
If you select the native OpenAir Mobile app and if OpenAir Mobile for Android version 2.3is not installed on your device, a screen appears inviting you to download OpenAir Mobile from the app store. Tap Go to Store and install OpenAir Mobile. The OpenAir Mobile page opens in the Play store. Once OpenAir has finished installing, tap Open. OpenAir Mobile opens and the synchronization starts automatically.
Note: The native app prompts only show if the SAML integration feature is enabled and Single Sign-On configured on your account and if the user has been granted the appropriate Exchange Access permissions. For more information, please see the OpenAir SAML 2 Quick Start Guide and OpenAir Mobile For Android User Guide
up
OpenAir is very excited to announce our upcoming migration into Oracle Cloud Infrastructure (OCI)!
We are very excited to leverage the power of OCI, which delivers unmatched reliability, scalability, and performance for mission-critical databases, applications, and workloads. Please refer to this page for more general information about OCI: https://cloud.oracle.com/cloud-infrastructure. Over the coming weeks and months, you will receive several communications regarding this move.
To ensure a seamless experience, there are some actions we need you to take that you can start today!
Use of this feature will support a phased migration with rapid rollback capability.
Your account domain is a combination of your Company ID name + app.openair.com. For example, if your Company ID is 'Acme Corp', your domain name would be acme-corp.app.openair.com. Spaces and other invalid URL characters are replaced by dashes. After it is enabled, your account domain will be visible in the URL of your browser after login. Support can confirm the name of your domain for you before enabling the feature.
While end users do not need to change their behavior after the feature is enabled, we need you to update several types of connections to OpenAir to use your Account Specific Domain name:
Endpoints in Integration clients
NetSuite Single Sign-On (SuiteSignOn) records to OpenAir
Any custom NetSuite SuiteScripts that do not use SuiteSignOn records but reference *.openair.com
Links to report extractions from OpenAir's OData Service
The URL set in OpenAir Windows desktop applications:
OpenAir Integration Manager, including shortcuts
OpenAir Exchange Manager, OpenAir Outlook Connector, OpenAir Microsoft Project Connector and OpenAir Offline
Anywhere else you may call our APIs and/or have a URL set with any form of openair.com to do so. This means instead of just www.openair.com/api.pl, www.openair.com/soap, etc, the URL will need to be (accountdomain).app.openair.com/api.pl, (accountdomain).app.openair.com/soap, etc.
You will need to open a Support Case to request OpenAir Support turn on the switch ‘Use Account Specific Domain’
You can have Support enable the account specific domain feature without previously or simultaneously updating your API endpoints. They will continue to work with the generic endpoint. However, these must be updated before OCI migration.
Note your users accessing via web, SAML, or our Android and iPhone apps do not need to change their navigation habits. They can still access your account by going to www.openair.com/index.pl. OpenAir Mobile users on Android and iPhone do not need to change their connection settings — updated OpenAir Mobile apps will use the correct domain automatically.
OpenAir will align with NetSuite policy to discourage whitelisting by IP addresses, and instead whitelist by domain. OpenAir will no longer guarantee a static IP address, and it may change without notice.
Please contact your IT department or technical team to be sure whitelisting for emails and Automatic Backup Service (if you leverage this feature) is being done by domain. They will need to ensure the following domains are whitelisted:
openair.com
system.openair.com
Your account specific domain (*.app.openair.com)
Note: Your account specific domain will be *.app.openair.com for a Production account, *.app.sandbox.openair.com for a Sandbox account, or *.app.demo.openair.com for a demo account, where the first part (noted *) is based on your Company ID name.
Our migration targets for Sandbox are November 2019 to January 2020, and for Production from February 2020 to May 2020. Migrations are expected to occur in phases and will involve some short downtime. You will be notified in advance of your downtime.
Please refer to our FAQ document located in OpenAir SuiteAnswers for additional information: OpenAir Moves to OCI – FAQ (Answer ID 87823).
A new Identity Authentication Service will be deployed in preparation for our move to OCI.
You will receive communications regarding this new Identity Authentication Service and confirmed deployment dates. It will be deployed first on Sandbox and later on Production, ahead of the migration to OCI.
Once the new Identity Authentication Service is deployed:
End users navigating to https://www.openair.com/index.pl for authentication will be redirected automatically to https://auth.openair.com/login.
End users do not need to change their behavior. Once redirected to the new authentication service, they will see a login page similar to the current login page for the core application and enter their credentials as per usual.
End users will be redirected to the core application as per usual upon successful authentication.
Note: End users will notice a change of URL in the address bar of their browser. They may notice a slight delay while they are redirected to the new authentication service and/or to the core application after successful authentication.
If SAML Single Sign-On is enabled on your account, you will need to update the configuration of your Identity Provider to ensure a seamless experience for your users accessing OpenAir using Single Sign-On. The SAML metadata and callback endpoint for the OpenAir Service Provider will be different for the new Identity Authentication Service. Details will be communicated in advance of deployment to allow you to plan for the change.
Advise your users they will be redirected to https://auth.openair.com/login for authentication.
There are no configuration changes required for other services.
Important: Target deployment dates and additional information including a link to a FAQ document will be communicated in advance of deployment.
OpenAir will no longer support SHA1 ciphers.
SHA1 ciphers will be disabled on September 23, 2019 for Sandbox and on January 15, 2020 for Production. If you have an integration tool using a SHA1 cipher, you must enable the usage of stronger, support ciphers prior to the deprecation dates, or your tool will not be able to connect to our services.
Support for stronger ciphers has been added ahead of the 2019.2 October release and is now available on both Sandbox and Production.
The following ciphers are currently supported:
| TLS_ECDHE_RSA_WITH_AES_128_GCM_SHA256 (0xc02f) ECDH secp256r1 (eq. 3072 bits RSA) |
| TLS_ECDHE_RSA_WITH_AES_256_GCM_SHA384 (0xc030) ECDH secp256r1 (eq. 3072 bits RSA) |
| TLS_RSA_WITH_AES_128_GCM_SHA256 (0x9c) |
| TLS_RSA_WITH_AES_256_GCM_SHA384 (0x9d) |
| TLS_DHE_RSA_WITH_AES_256_GCM_SHA384 (0x9f) DH 4096 bits |
| TLS_DHE_RSA_WITH_AES_256_CBC_SHA256 (0x6b) DH 4096 bits |
| TLS_DHE_RSA_WITH_AES_128_GCM_SHA256 (0x9e) DH 4096 bits |
| TLS_DHE_RSA_WITH_AES_128_CBC_SHA256 (0x67) DH 4096 bits |
OpenAir will stop supporting LDAPS (secure LDAP) service for authentication effective in April 2020 with OpenAir Release 2020.1.
Best practice security design standards for cloud applications require modern and robust protocols for distributed authentication. Delegated authentication by means of an LDAP request over the internet does not meet these design standards. This change is integral to delivering good designs and security architecture decisions in order to protect our customers' data.
You will need to discontinue authenticating into OpenAir via LDAPS by April 2020. Rather than using passwords, you may want to replace your existing LDAPS service with a SAML 2.0 service.
Note: OpenAir strongly recommends that you discuss this upcoming change with your IT/technical teams to allow them time to prepare for this important change.
OpenAir desktop applications will stop supporting Microsoft Windows Server 2008/2008 R2 and Microsoft Windows 7 effective on January 14, 2020.
Microsoft will be ending support for both products on January 14, 2020.
To continue working with OpenAir Exchange Integration Manager, Integration Manager, Offline, Outlook Connector and/or Projects Connector, you will need to:
For Microsoft Windows Server 2008 and 2008 R2, upgrade to MS Windows Server 2012, 2012 R2, 2016 or 2019.
For Microsoft Windows 7, upgrade to MS Windows 8, 8.1 or 10.
Note: OpenAir strongly recommends that you discuss this upcoming change with your IT/technical teams to allow them time to prepare for this important change.
up